Thursday, January 30, 2014

Battle Report - Tyranids vs. The Imperium (SM/SW)

The final installment of this little trilogy of Tyranid battle reports is a mammoth one. Jamie, Dan, Matt and I booked a table in our FLGS (Wargames Emporium, Sheffield) last Sunday and got stuck into a 3,500pt doubles game (i.e. 1,750 each). Both sides were making the most of double FOC and cramming plenty of units in. The Imperium of Man was represented by the Space Wolves and Ultramarines (in this case a successor that looked suspiciously like Blood Angels!).

1,750pts of Space Wolves (Me)
Ragnar Blackmane
Arjac Rockfist and 4 WG terminators in a Land Raider
Lone Wolf in terminator armour with fist and shield
2x 10-man grey hunter packs with plasma, melta, wolf standard and wulfen
14 blood claws (one with flamer) joining Ragnar in a LR crusader

1,750pts of Ultramarines (Matt)
Tigurius
Cassius
8 Sternguard in a Drop Pod
6 Scouts (5 snipers, 1 bolter)
2x 10-man tactical squads (melta/flamer, missile pod)
10-man assault squad with jump packs (power fist)
Stormtalon (lascannons)
Stormraven (multi-melta, assault cannons)
Centurion Devastators (grav cannon/amps, omniscope)

The Tyranid horde was represented by contingents from Hive Fleet Kraken and Behemoth.

1,750pts of Tyranids (Dan)
2x Hive Tyrant with twin-linked devourers with brainleech plus two tyrant guard
3 Venomthropes (conversions that look like jellyfish on the pictures)
Tervigon
30 Termagants (5 devourers)
2x 3 Biovores
3 Dakkafexes

1,750pts of Tyranids (Jamie)
Flyrant with HVC
Tervigon
30 Termagants
9 Warriors with 8 deathspitters plus barbed strangler
15 Gargoyles
Harpy
Hive Crone
Mawloc
3 Carnifexes (1 with crushing claws)

I'd like to point out that the aim of the game was to have fun and test a few things in the new Tyranid codex rather than fielding particularly competitive lists. Obviously there were cheesy elements in both lists like double devourers on tyrants/fexes and our centurions but we tried to keep it to a minimum.

Pre-game
We'd be playing Big Guns and elected to use Dawn of War deployment as it was easier logistically. Tigurius got Hallucination, Prescience and Perfect Timing. The tervigons took Dominion. The tyrants got a mix of powers between them including paroxysm, warp blast and catalyst. We played with a warlord each and their tyrants got Synaptic Lynchpin and Digestive Denial as their warlord traits, Tigurius stuck with his trait and Ragnar got -1 to reserve rolls. There'd be Night Fighting on the first turn. Jamie and Dan got to pick deployment zone and won the roll for first turn too. They could barely fit all of their nids in their zone even though it was an 8' x 4' table! We spread our forces out so that we could try and spread the Tyranids thinly and prevent hordes of termagants from swamping us.

Turn 1
I confidently told Jamie and Dan that I was going to Seize now and to the suprise of us all, I actually did! This allowed us to bring down the sternguard on their left flank and with help from the jammy scouts who rended 4 times (I think, might've been 3) they downed one of the Tervigons straight away for First Blood. Elsewhere we caused a couple of wounds on a hive tyrant and thinned out the big termagant hordes a little.

The tyranid response was pretty brutal with Cassius and his sternguard being cut down to size by the gargoyles (who decided not to bother with Blinding Venom in a bid to kill the squad off instead). Cassius and a couple of sternguard survived the initial onslaught though and swept the gargoyles. The dakkafexes enacted their own vengeance causing 25 wounds on my grey hunters who promptly failed 10 of their saves wiping them out! The tervigon spawned something like 15 termagants but was corked in the process so there'd be no more bonus nids. The flyrant hit the land raider with warp lance but despite penetrating he could only shake the mighty tank. The biovores killed off a couple of tactical marines and pinned both squads and the harpy was similarly effective. Meanwhile the hive crone drooled on the scouts picking off a few.

Turn 2
Unfortunately our flyers failed to arrive which meant we'd struggle to deal with their FMCs this turn. One of the assault combat squads arrived though and dropped in near the sternguard to support them in combat. Cassius and his squad headed towards the termagant blob whilst Ragnar's land raider disgorged him and his pack of blood claws who charged headlong into combat with the combat carnifexes easily dispatching them. Cassius was able to stay locked in combat with the termagants who surrounded him and prevent the warriors from charging next turn.

On the other side of the field the centurions made the dakkafexes pay for killing the grey hunters by wiping them out with their grav-cannons. Tigurius had tried to use hallucination on them but they'd denied the witch. The other land raider rumbled forward and Arjac piled into combat with the flyrant (who was downed by the land raider) whilst his terminators charged into a blob of termagants. The remaining grey hunters had lined up to charge the hive crone but despite forcing 4-5 grounding tests the crone remained aloft and only took a single wound.

The crone stayed up in the air sweeping over the grey hunters before finishing off the scouts with this drool. The mawloc arrived, killed two of the three centurions and left the sergeant wounded. The warriors fired at the blood claws thinning them out significantly before charging in and leaving only Ragnar and a couple of the young space wolves alive. The hive tyrants elected not to charge into combat with Arjac and his pack instead happily allowing them to chip away at the termagants. The biovores killed half of the grey hunters and more tactical marines.

Turn 3
Tigurius tried to use Hallucination on one of the walking hive tyrants but once again Dan denied the witch. Our flyers finally arrived and lined up to try and take down both the crone and harpy (or at least force them to drop so the land raiders could finish the job). The lone wolf (who I'd forgotten to deploy) also arrived from reserve and headed in to take on the mawloc next turn. The flyers failed pretty miserably at their job with neither killing its intended target. Luckily the harpy was knocked out of the sky and the land raider was able to finish it off with lascannons. The crone survived the drop too but the hurricane bolters from the crusader were able to finish it off. Tigurius and the remaining centurion tried to gun down the mawloc with help from the tactical squads but it remained on 2 wounds meaning they'd need to charge it to prevent it burrowing. Luckily they survived the combat this turn but with Tigurius' rod only being AP4 the mawloc made its saves.

Meanwhile the assault marines went in to help Cassius out and luckily left a single termagant standing to protect them from biovore fire. Ragnar found himself alone and surrounded by warriors whilst Arjac and his terminators were still chewing through gaunts. The remaining grey hunters hopped into the land raider Ragnar had vacated.

The tyrants attempted to down the stormtalon with their brainleech devourers but could only strip a hull point and stun it. Cassius and co. finished off the remaining gaunt and consolidated towards the warriors. Ragnar survived with a single wound.

Turn 4
The lone wolf now charged into the mawloc and was able to finish it off where Tigurius had failed. The two assault combat squads, along with Cassius, charged into combat with the warriors. It was too late for Ragnar though who died to give our opponents Slay the Warlord. The warriors were heavily thinned out in return though. Matt and I now had a heated debate about whether to fire at the venomthropes or the tyrants. I still maintain we should've shot the venomthropes first but as with anything like that in 40K we'll never know. Either way the tyrant and his unit only took a couple of wounds from the flyers and land raiders. The lone wolf headed in the direction of the tyrant hoping to finish the job. Arjac and his terminators finally finished off the termagants even though we could've done with him staying in for just one more turn.

The tyranids had very little firepower left and the tyrants weren't likely to be able to charge anything. What they did have they used on Arjac and his remaining wolf guard (he'd lost 3 terminators to gaunts!). The champion was cut down easily but with the assault squads and Cassius now free of combat our final turn should be bloody.

Turn 5
Cassius charged the nearest squad of biovores solo and was able to finish them off. The two assault squads charged into the venomthropes and wiped them out too. The lone wolf charged into combat with the tyrant. The tyrant caused 4 wounds, the lone wolf saved two on his shield and a third with FNP. This allowed him to down the tyrant (their second warlord) with his power fist and forever etch his name in the sagas. Meanwhile the two land raiders had moved onto objectives with one dropping off some grey hunters on another. With the one controlled by the tactical squad this gave us 4 of the 5 objectives meaning little chance for the tyranids to take the win.

One of the tyrants attempted to charge a land raider but rolled a triple 1 through terrain. The game ended here with one objective for the tyranids and four for the Imperium (plus first blood, linebreaker and 2x slay the warlord).

Imperial Victory 16-4

Conclusion
When we first saw the number of tyranids arrayed against us we weren't quite sure how we were going to deal with them with so few models of our own. Obviously the land raiders would be impossible for the tyranids to destroy with shooting (aside of warp lance) so as long as we kept them out of charge range we'd be safe. It's a shame really that it was Big Guns as it would've been a lot closer scoreline without it. I'm not sure Dan and Jamie realised that vehicles can score in big guns.

Stealing the initiative and killing a tervigon was undoubtedly a big deal and when the other tervigon corked we knew we'd had a lucky escape. Had the warriors been able to finish off Ragnar quicker then they'd have been able to charge the assault squad and the result would've probably been different. The flying MCs could've probably been used to bring down the land raiders earlier on but, again, I don't know they realised they were scoring or they'd have probably done this. The hive crone passing soo many grounding checks was a real hindrance early on although if we'd had our flyers on turn 2 it probably would've been dead sooner. It was frustrating when we couldn't get them even with Tigurius' re-roll!

There's a couple of Tyranid units worth mentioning here. Firstly the warriors were actually pretty good. Obviously they're vulnerable to power fists in combat but a big enough squad with guns puts out a lot of fire and isn't easy to shift since they're always Fearless. Perhaps there are better ways to spend the points but I don't think they should be discounted. In smaller numbers I think they'd struggle though.

Secondly, biovores were great. This isn't really news as the interwebs are pretty impressed with them but being able to put out large pinning barrage blasts against massed troops is excellent. I'd say it's worth swapping a mawloc (or even two) for a squad and having 20pts to spare. They shone against marines so against kroot, fire warriors, guardians, cultists etc they'd be excellent.

Overall it was a thoroughly enjoyable game, my personal highlight being the lone wolf cutting down both a mawloc and a hive tyrant. We're going to play another round (with slightly altered teams) next month. It'll be Chaos vs. Angels of Death so keep an eye on the blog for that one. Right, now I've got no excuse not to finish my Tyranid reviews before getting to the small matter of a thing called Blog Wars 7.

Tuesday, January 28, 2014

First Attempts at Airbrushing!

I recently picked up a compressor and a couple of airbrushes from eBay. I'd done quite a bit of research about what type of compressor and airbrush combo to go for. The general consensus seemed to be that a piston compressor with a cylinder gave the right balance of reliable, constant air flow whilst keeping the price down. I plumped for this little number from eBay at £60 with two airbrushes (neither of which I'm using at the moment but they might come in handy later).


On eBay it's referred to as the AS186 and I think some sellers provide it without the cylinder. As I say the cylinder is a good idea though as you get a more consistent pressure whilst spraying. Anyway, the listing showed two different brushes but when I opened the box one of them didn't match the pictures plus the case of the other was damaged. I managed to persuade them to give me a partial refund with which I was able to pick up this airbrush:


A lot of sellers refer to this as the HS30. Basically it's a cheap knock-off of the more expensive named airbrushes like Iwata and Badger. Of course it isn't going to last as long and probably isn't as well made but it cost me around £10 which I was more comfortable paying when I wasn't sure how much use I was going to get from it. In addition I picked up a cleaning station for a tenner that doubles up as a holder and allows me to blast through some cleaning solution in between colours whilst filtering some of the vapour that is generated.


I've watched rather a lot of videos on YouTube about airbrushing including OrcPainterNerd, MarneusAugustusCalgar and Wargamers Consortium amongst others. Most recommend having a go on some paper first to practice the action and get the mix right. I had a bash with some thinned down Mephiston Red and sprayed some pretty patterns on some paper. Generally I wanted an idea of how the spray pattern changed depending on proximity of the airbrush to the surface and how far you need to pull back the trigger to get a good flow. I'm led to believe that better airbrushes have smoother actions and more control but to me my cheap little brush seemed pretty good.

After that first session I took the airbrush apart to clean it. I know you don't really need to but I wanted to see how it went together. A couple of bits were a bit tricky to re-assemble but generally it's a pretty simple construction so taking it apart once in a while for a good clean should be do-able.


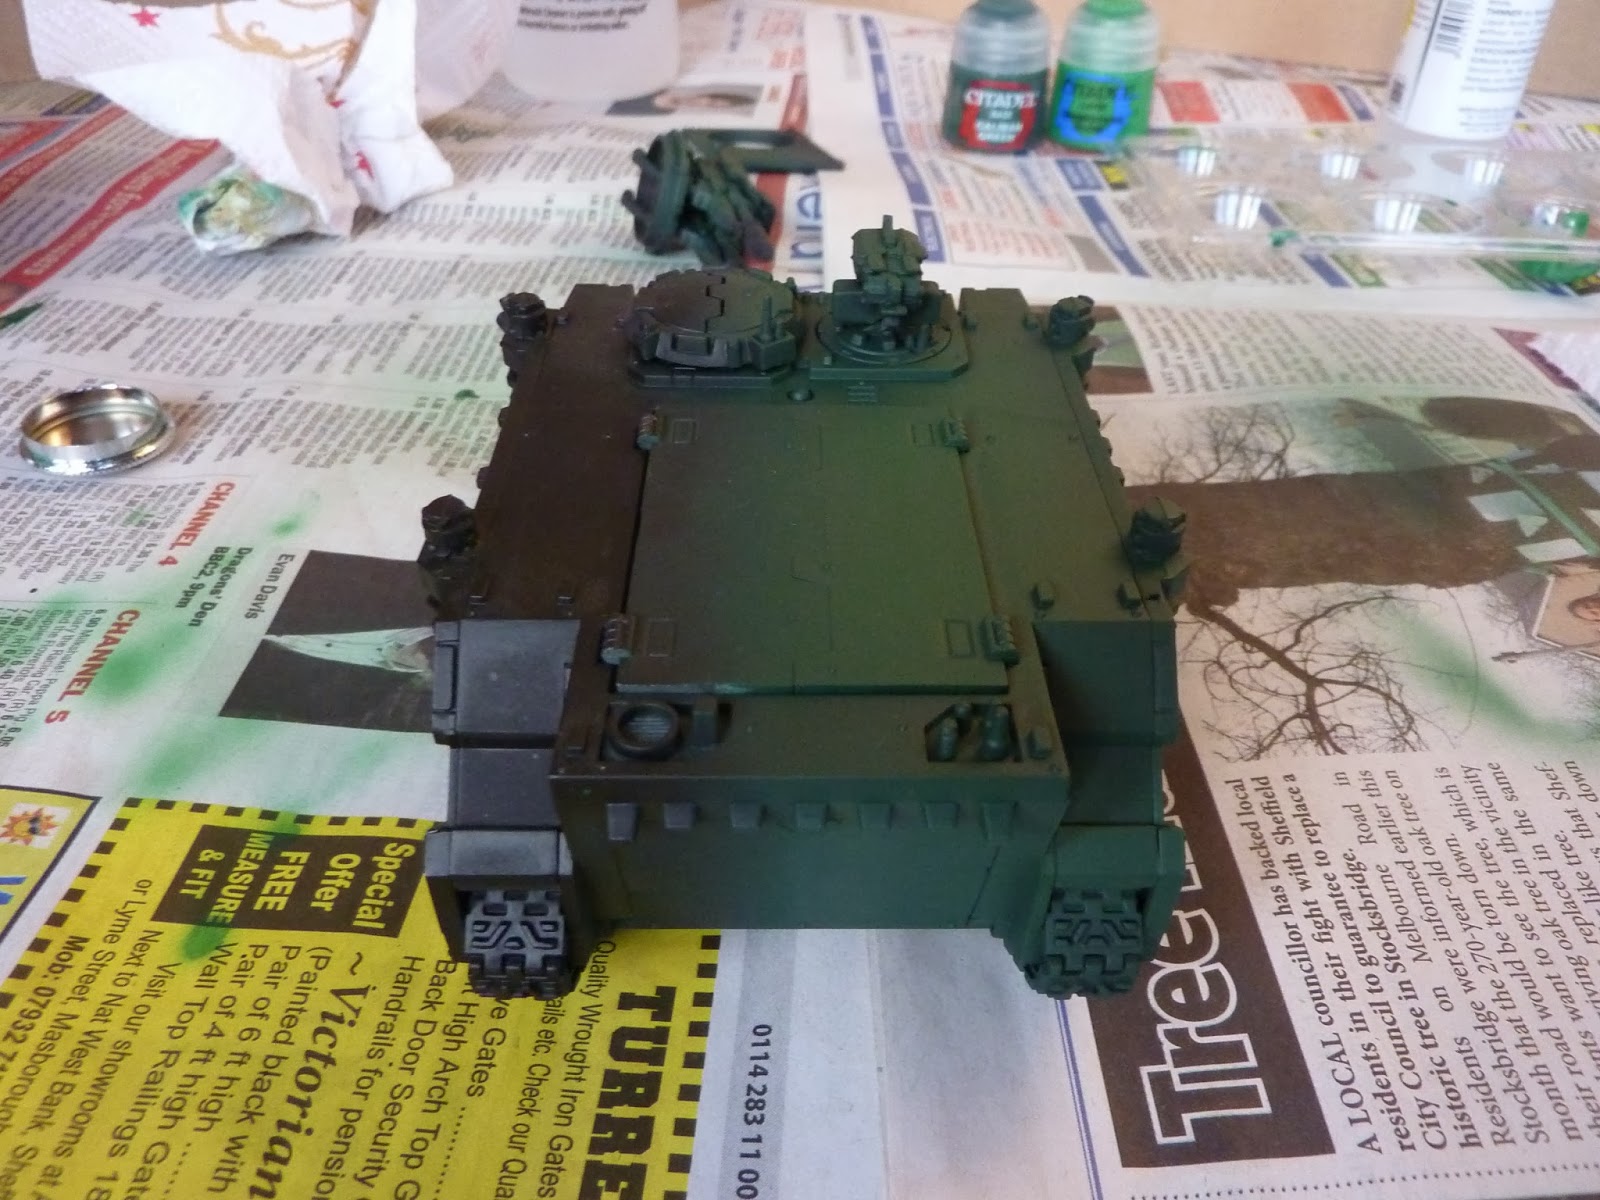
I've had a rhino lying around for a while now that was originally assigned to my Space Wolves but when 6th edition pushed people away from mech I tossed it in the direction of my Dark Angels for the odd occasion I might want to run a rhino with my bikes. You may remember that I've been painting my Dark Angels up in a similar scheme to the Angels of Redemption. You can see my test model below and I must confess I haven't painted many more models since him. I do have a couple of bike squads up to table-top standard but my motivation to paint them waned when I quickly got bored of the new DA codex.


Nevertheless it was a good excuse to give the airbrush a go on a nice big model first and also an opportunity to try masking and seeing how well that works. The rhino was already sprayed with Chaos Black so this would be a good test of how well the airbrush could cover with lighter colours. To start with I sprayed one half of the model with Caliban Green (incidentally I'm using Vallejo Airbrush Thinner to "water" down). I then added some Warpstone Glow to the mix and tried to spray a thinner coat in attempt to shade. I think I probably got a bit carried away though so the shading is kind of lost.


After that I left it to dry for a bit. Not sure this was necessary mind you as I think it was dry by the time I'd washed out the brush. I then used some conventional masking tape (B&Q's finest) to mark a line down the centre of the tank. I toyed with the idea of taping some newspaper over the green bit to avoid overspray but I wanted to test out the accuracy of the airbrush so I decided not to bother.


I sprayed a coat of Rakarth Flesh over the other half doing my best to get an even coat and get into all the nooks and crannies. Once the tape was removed the "final" finish was revealed. I use the inverted commas because it's actually barely started. I want to spray on some chapter heraldry and then go to work with a regular brush to add details. I'll come back to the airbrush at the end though to add some weathering.


As you can see from the picture below I probably should've taken more care to smooth down the masking tape as there are small leaks where it wasn't down enough. Additionally I probably should've employed the newspaper idea as I've gone over the other side of the tape a bit. This is probably just me being overzealous rather than the brush being inaccurate. These will be pretty easy to touch up with a regular brush though and I'm happy with the finish and the time it took me to achieve it. There's no question that, even including setup/cleaning of the airbrush, it was much quicker than using a big brush. I'd have never gotten the finish as smooth either. Not bad for a first attempt I reckon.


Couple of things I've learnt so far. Firstly it's a good idea to mix more paint than you'd think. It's annoying to have to mix more when you're in the middle of a colour and you can always pop it back in the pot since it'll barely affect the mix. If you're worried I'm sure there's empty pots lying around that it could go in. Secondly an old brush seems to be the best tool for mixing the paints. I was trying to use the pipettes but they're too much of a faff and you end up losing half of your paint inside. The old brush is great for getting the paint into the airbrush cup too. Finally, it's a good idea to have plenty of kitchen roll to hand. Very useful for cleaning out the cup (I'm using Medea Airbrush Cleaner), test spraying before committing and generally avoiding mess.

Overall I'm pleased with my purchase. I know I've got nothing to compare it to but it's actually much better than I thought. Obviously I'm just doing block colours here so I'm not really testing myself too much. When I start to work on my Dark Eldar I'll be trying some fading and more intricate masking and stencil work. Anyway, I hope this stuff will be interesting and at least I'm getting some hobby content on here for a change! I'll post again once I've done the stencilled chapter logos etc.

If anyone is thinking of getting an airbrush feel free to ask questions in the comments and I'll either answer or point you in the direction of a good youtube video!

Saturday, January 25, 2014

Battle Report - Tau vs. Tyranids (1750pts)

I hope you enjoyed Matt's report of his game against Scott's Tyranids. Today I'm going to talk about the game Scott and I had on Thursday. Scott was running pretty much the same list as he had against Matt (skip back to yesterday's post to check it out). I was running my mech Tau list that I've run in one form or another for a while now. Essentially, fire warriors in three devilfish with an ethereal, a missile crisis team, three squads of pathfinders, two riptides and a fusion plasma commander with similarly equipped bodyguard.

Pre-game
We rolled Relic with Dawn of War deployment. It'd be Night Fighting the first turn too. I rolled the warlord trait that prevents my commander from scattering when he deep strikes. Scott got the carnivorous jungle trait. His two tervigons took Dominion whilst the Hive Tyrants both got Paroxysm with one getting Warp Blast and the other getting Catalyst as their secondary powers. I won the deployment zone selection but Scott took first turn and I failed to Seize.

Turn 1
Scott moves all four FMCs right up into my face. With one of my pathfinder teams Scouting into a ruin in the centre they were a prime target for a vector strike from a tyrant. This was followed by devourer fire which finished off the squad and gave Scott the crucial First Blood. Otherwise the Tyranids did little damage to my Tau. One tervigon spawned 15 termagants but was corked. The other spawned 12 and there was more to come.

The drones from the devilfish were able to down one of the crones. Once on the ground the crone was no match for the missile team with markerlight support. All of the fire warriors had disembarked with the aim of helping the riptides deal with the other FMCs but both riptides failed miserably and all of the remaining FMCs stayed aloft. The next turn was going to be painful.

Turn 2
One of the mawlocs and the outflanking termagants arrived from reserves. The termagants came in on my right flank but there was nothing in range for them. The mawloc faired better killing 8 fire warriors with its Terror attack. The hive crone used its vector strike to finish off the squad before helping one of the tyrants to destroy the ethereal's devilfish. Meanwhile Scott rolled a perfect 6/5/4 roll for his active tervigon giving him a further 15 termagants. The other tyrant charged into combat with the riptide and used his bonesword to full effect by rolling a 6 to wound. Despite having nova'd for a 3++ save the riptide was cut in half by the tyrant.

One of my kroot units arrived and cut into the outflanking termagants with their rifles. The commander and his bodyguard dropped in behind the tyranids. I'd hoped for marker support but the pathfinders failed to hit the mark with a single markerlight. Even so, the commander shot down the venomthrope whilst his squad managed to strip several wounds from the tervigon. I'd hoped they'd be able to kill the tervigon outright and cause a synaptic backlash but now I needed to use the fire warriors to finish the job instead of gunning down some gaunts. The tervigon managed to survive the fire warriors' volley with a single wound but I spotted a couple of drones I'd not fired who were lucky enough to finish the job. The tervigon perished taking something like 12 termagants with him. The crisis team killed off another hive crone with ease. The riptide managed to finish off the bonesword tyrant but needed help from the pathfinders thanks to the effects of paroxysm.

Turn 3
The termagants in the centre claimed vengeance for their fallen mother by charging into the fire warriors and cutting down a whole squad plus the ethereal. The remaining tyrant charged the remaining riptide but could only take him down to one wound. The tervigon spawned another 12 gaunts but still wasn't finished! He then charged the commander and his unit but fluffed his attacks and took a wound in return. One mawloc burrowed whilst the other remained in reserve. The outflanking guants failed their instinctive behaviour and had to run towards cover.

With both of the remaining MCs in combat there were only gaunts to shoot at. More kroot arrived and killed off a small unit of gaunts. The remaining fire warriors and missile team killed off the big squad of gaunts. The other kroot killed off more gaunts from the outflanking squad and forced them to flee. The riptide was cut down by the tyrant in combat.

Turn 4
One mawloc arrived safely and took out all but two of the remaining fire warriors. The other tried to target the kroot on my right flank but mishapped and ended up misplaced safely in the back corner. Despite being busy in combat the tervigon spawned another 8 gaunts whilst killing a bodyguard. The tyrant vector struck the missile team killing two and finishing the third with his devourers. The termagants gradually moved towards the relic to claim it.

The two remaining fire warriors hopped into the devilfish to hopefully claim the objective if I could some how clear it or at least contest it. I was pretty much out of firepower though and the kroot needed to run to try and make it to the relic should they be required.

Turn 5
The mawloc charged into the devilfish, blew it up and killed both fire warriors inside! The tervigon finished off the commander and his bodyguard whilst spawning another 8 gaunts. That gave Scott 4 VPs (First Blood, ethereal, Linebreaker and Slay the Warlord) to my single VP (Slay the Warlord). That meant the game was pretty much over unless I could get both linebreaker and the relic somehow with all those gaunts, two mawlocs and a tyrant around.

There was little left for me to do but run the kroot in a vain hope of grabbing the relic. The pathfinders tried to kill the tyrant with their carbines but failed.

Turn 6 & 7 
I'd pretty much conceded anyway but we got turn 6 and 7 so played them just to see how much damage the tyranids could do to my remaining kroot and pathfinders. The tyrant finished off one pathfinder unit whilst the mawloc re-emerged and killed off the kroot. In the end I was left with 4 pathfinders and a devilfish.

Oh and the remaining tervigon went on to spawn 12 gaunts in turn 6 and finally in turn 7 Scott rolled a triple 5 to create a final 15 termagants! That meant the tervigon spawned a total of 78 gaunts over the 7 turns!

Final Result - Tyranid Victory 4-1

Conclusion
The tervigon was undoubtedly the winner here. Obviously the hive tyrants and mawlocs did their jobs but ultimately it was an objective game and the relic never looked in danger. The mission certainly played into the tyranids' hands (or claws) but any of the objective missions would've probably had the same result with so many guants! Now I'm not going to pretend that I'd expect the tervigons to do so well in every game but clearly they have that potential and despite the points cost they're still worthwhile. They can of course move before they spawn their termagants too which means you can get them a bit further forward.

There were several things I should've done differently or could've gone my way. If the pathfinders had lit up the tervigon then my suits probably would've killed him without help from the fire warriors and drones. That would've freed up the fire warriors to kill gaunts and probably saved their own lives along with the ethereal. I was complacent with the commander and his team too. There's no way I should've put them so close to the tervigon and allowed it to charge. That would've kept them alive too and probably allowed them to kill the other tervigon instead.

Finally there was one tactical play I could've made that I missed. In my turn the riptide was in combat with the tyrant and had a single wound left. If I'd rolled for nova I'd have either failed it and killed him allowing me to shoot the tyrant or else keep him locked with a 3++ save perhaps. Either way it would've stalled the tyrant and saved the crisis team for another turn. There's always things that could've gone differently though and I don't want to take anything away from Scott who played well and punished my mistakes.

Between the two tervigons there were 93 bonus gaunts. Not only is that a scary amount for an opposing army but Scott was lucky he even had enough models! I can't believe it didn't cork itself until turn 7. It's pretty incredible luck on Scott's part but still, as I say, there's always that possibilty with tervigons. Sure they're more expensive and not as good as before but they're still great in objective games when they don't cork early. Dominion is a must for them though to keep the gaunts under control.

That list contains 4 FMCs and 4 MCs. Some armies literally can't deal with that many monsters. Of course broadside spam, farsight bomb, etc wouldn't struggle but name me an army that can reliably beat them? I think that's part of the problem with the Tyranid book. Eldar and Tau are so strong right now that they're the yard stick for any new book. Frankly a mostly combat army was never going to have a hope against the kind of power the top lists can come out. I, for one, didn't want to see Tyranids reduced to another shooty army so they're always going to struggle in that environment.

It's worth remembering that although on paper the tervigons and mawlocs aren't amazing in combat, they're still MCs. That means Hammer of Wrath and Smash which aren't to be sniffed at. They've got anti-vehicle utility and as the tervigon proved they can insta-kill stuff easily enough. If there aren't power weapons around their T6, six wounds and 3+ save should keep them alive in combat for sufficient time to get something else in to rescue them if they can't handle it themselves.

I'll be writing up my Synapse post soon I promise but I wanted to get this battle report done whilst it was still fresh in my mind. I'm playing another game against tyranids on Sunday when Matt and I team up in a 3,500pt (2x1750) doubles game with Jamie and Dan. We'll be running marines and wolves against the horde and there'll be a report on the game of course. Once that's done I'll write my final verdict on the new book so that I'm actually basing it on experience instead of pure theory.

LinkWithin

Related Posts Plugin for WordPress, Blogger...