Thursday, March 19, 2015

7th Edition 40K - Dark Eldar Scourges - Weapons Appeal!

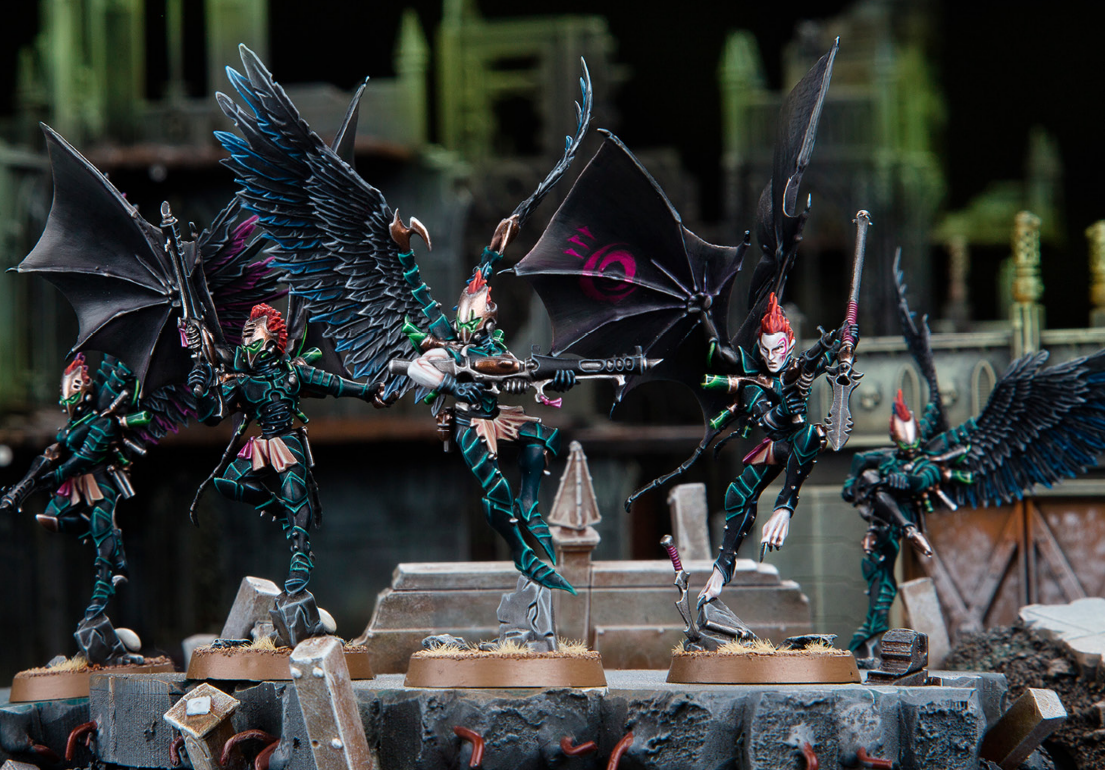
So, my post about using Dark Eldar and Harlequins together has inspired me to finally assemble the two squads of Scourges I purchased when they were first released. They were sat in the box for a long time because for the points I felt Reavers were a better choice. Whilst I still think Reavers are great, Scourges now have the option of running four heavy weapons in a single squad. You can debate the pros and cons of different weapons but for me the standout choice is the haywire blaster. It means a squad can almost guarantee at least three glancing hits on a vehicle. It's difficult to work out the odds given it's a blast weapon but it's still a decent chance of hitting and then 5 in 6 chance of at least a hull point. Throw in the fact that they can also be used as reasonable anti-infantry fire and I think they're a clear winner over the other options which are either pricier or not as flexible.

Anyway, the point of this post is that I simply don't have enough of them. Each box gives you just a single haywire blaster. Not a problem, I thought, I'll just use the haywire blasters from the two Talos/Cronos kits I have and splice the barrels onto the heat lance body. That's fine apart from the fact that you get just a single heat lance per box too. With the barrels from the Talos that's a total of four complete haywire blasters leaving me four short. I've then got two further barrels from the second Talos kit (I put heat lances on mine) but no more gun stocks to mount them on. The splinter cannon and dark lance stocks aren't really suitable. You could attach them easily enough but they wouldn't look right. I'm then still short of two more complete haywire blasters to make the 8 I need for my two squads.

I know some people simply attack the spikes from the Kabalite Warriors kit to the heat lance but that doesn't solve the problem of not having enough of them in the first place. Of course the alternative is to completely create my own version of a haywire blaster from scratch and have all of them carry the same but I'd prefer to use the proper thing or as close as I can get to it.

So here's my appeal. If there are any Dark Eldar players out there who have one or more of the following please get in touch with me:

  • Actual haywire blasters from the Scourge set:
  • Heat lances from the Scourge set:
  • Haywire blasters from the Talos/Cronos kit (I'll still need stocks but it's a start):

I'm more than happy to pay you for these bits or I'll gladly swap you for other bits you need for your army, be it from Dark Eldar or one of my other armies (Tau, DA, Orks, Wolves). I've got extensive supplies of bits (that I really must sort through one day). Incidentally, I've looked on various bitz sites and eBay. I can see a Talos weapons sprue on there to give me the barrels but I'm loathe to buy this if I can't get the stocks for them. Otherwise everywhere is out of stock of Scourge guns.

If anyone has any alternative suggestions for how I could make the conversions, or where I might be able to get the bits from, I'm all ears! I'll post about how to convert using the heat lance stocks and haywire barrels once I know I've got enough for both squads.

Any help is appreciated to save me buying two more Scourge kits and putting them up on eBay minus the guns. I could probably make a profit by splitting them up but I'd rather avoid this if possible.

Wednesday, March 18, 2015

7th Edition 40K - Using Harlequins in a Dark Eldar Army List

So, suffice to say I was pretty excited by the Harlequins codex. They're not all-conquering by any stretch of the imagination but there's some innovative stuff in the book that I'm looking forward to putting into play. Whilst I'd love to have a full Harlequins force at some point, I'm going to start off by simply allying them with my Dark Eldar. Of course, you could ally them with Craftworld Eldar (or the Imperium, Tau or even Orks for that matter) but since I no longer own any Eldar, I won't be discussing them here. Besides, I don't think Eldar need much help from Harlequins and they don't lend themselves as well to an alliance as they don't have a decent transport for the Harlies that won't hamper their assaults.

Dark Eldar on the other hand, there's a match made in heaven I reckon. If nothing else, there's the fact that their Raiders are open topped, and hence assault friendly. The other thing is that, with the new codex, Wyches are pretty much a total waste of time now. This is partly because you can cut them down with bolter fire (since they can't start with FNP) but also because they lost access to haywire grenades. Combine that with their relatively high cost and I doubt we'll be seeing them on a tabletop any time soon. This leaves a big hole in the Dark Eldar army for a decent assault unit. In come the Harlequins then.

For the purposes of this article I'll be assuming that you're only allowed two detachments and I'll be working with 1,750 points (as this is the norm at my FLGS). Of course, with more detachments available you could take multiple formations alongside your DE. As I discussed in the last post of the Harlequin codex review, the stand out favourites amongst the formations are the Cast and Revenge. Let's not forget the Masque detachment itself though which has its merits.

My aim here isn't to tell you what I think is the best possible combination of DE and Harlequins but rather explore some options to get your imagination going and inspire your own lists. Are these lists invincible? Far from it. In fact they're all going to be pretty flimsy especially if you don't go first but that's what DE players are used to right?

Dark Eldar plus Cast of Players
For those not familiar with it. The Cast of Players allows you to take a Shadowseer, Death Jester and Troupe although this is without the crucial Rising Crescendo rule. Here's how I'd run the Cast:

Death Jester (no upgrades)
Shadowseer (ML2, Mask)
Troupe (8 players with 3 kisses, Troupe Master with kiss)


That clocks in at 335pts which is pretty expensive for a squad of T3 models but with the Shadowseer they should be reasonably durable. You need them to hit hard though so having those Kiss of Death attacks will come in handy. The squad will have 37 S4 attacks on the charge, 4 S6 AP2 and 5 S6 from the Shadowseer. All of these attacks will be hitting at a minimum of I6 with WS5 too. That in itself gives them pretty good protection in combat with the Shadowseer providing the cover from shooting. Of course you can drop a model or two so they can fit in a Raider.

The Mask is in there to create a nice combo with the Death Jester for a -4 Ld penalty when using his Death Is Not Enough rule. We can make this even better with out DE allies by adding in an Archon. Giving the Archon the Armour of Misery, a webway, an agoniser and shadow field makes him pretty pricey but awesome. That does bring the whole squad total to 500+ pts though which is a big chunk of any army. That being said, when they do arrive from reserves you'll be getting a hit from Psychic Shriek at -4 Ld plus another unit shot with Death Is Not Enough at - 6 Ld. Best hope they arrive early on then!

This unit should be able to deal with most things pretty effectively in combat but we'll still need some firepower. Let's flesh out the rest of the army then. For the DE Troops I'd go for four units of Kabalites in venoms with a blaster each. I still think the blaster is worthwhile for extra anti-tank. Add in a couple of units of haywire Scourges and a couple of Ravagers for more anti-tank. That leaves a decent chunk of points spare still at 1,750pts. I think we need a distraction to keep everything alive long enough for the Harlequins to arrive. That comes in the form of a big Reaver unit which is a decent combat threat and packs heat lances to help with anti-tank.

Here's what I've got then:

Combined Arms Detachment (or Realspace Raiders Detachment)
Archon (agoniser, shadow field, webway, Armour of Misery)
5 Kabalite Warriors (blaster) in Venom
5 Scourges (4 haywire)
10 Reavers (champ w/ agoniser, 3 heat lances, 3 caltrops)
Ravager (lances)
Ravager (lances)

Cast of Players Formation
Death Jester (no upgrades)
Shadowseer (ML2, Mask)
Troupe (8 players with 3 kisses, Troupe Master with kiss)

We can strip it down somewhat to go down the "more boys, less toys" but there isn't much else I'd want. Perhaps another Venom, Ravager or even a flyer but I think the list is decent on most counts. It can hammer high toughness models like Wraithknights, kill off infantry and still be able to break vehicles apart. It does struggle with flyers but that often won't be a problem. It's flimsy as hell of course but that's true of any DE list. My worry here is that the Harlequins are reduced to a gimmick. You're basically including them just to get the leadership modifiers. Don't get me wrong, that could be disgusting but you might wait until turn 4 to get them and there'll be little of the rest of your army left by that point.

Dark Eldar plus Faolchu's Blade
This time we won't be including any Players at all and instead we'll be throwing in some Harlequin vehicles. Let's take a look at my proposed list:

Combined Arms Detachment (or Realspace Raiders Detachment)
Archon (agoniser, shadow field, haywire grenades, webway, Armour of Misery)
Court of the Archon (2 Sslyth, 2 Medusae)
5 Kabalite Warriors (blaster) in Venom
5 Scourges (4 haywire)
Razorwing Jetfighter

Faolchu's Blade Formation
3 Voidweavers (haywire)
3 Skyweavers (haywire)

As you can see, there's a huge amount of haywire firepower in this list. It's not out of the question to be able to take down multiple vehicles in a single turn. Alternatively you can combine a few units to bring down something like a holo-fields wave serpent or an Imperial Knight. In fact, it's quite likely you could down an Imperial Knight in one shooting phase given how mobile some of your firepower is. Don't forget the haywire cannons/blasters use a small blast so hitting two closely deployed vehicles is feasible. Not only that but your S4 blasts are decent for taking down troops too. Remember frag missiles on those long fangs back in 5th? It's actually better against S3 than your Venoms' splinter fire.

Aside from the haywire we've got 5 Venoms with their poisoned fire and blasters from the warriors plus more poisoned fire. The Archon's court is a bit of an experiment but having a deep striking venom with the Medusae's eye bursts could be nasty and the Sslyth help with survivability, especially once a Medusa dies and you're effectively T5.

As with any DE or Harlequin list the mobility is a key factor. This list can cover ground at a rapid pace which should serve you well in Maelstrom games.

Pure Harlequins
Let's take a look at what we can do with the Harlequins on their own. In this scenario I think the Revenge is the best choice as that re-roll of 1s on invulnerable saves will help matters.

Cegorach's Revenge Formation
Solitaire (Rose)
3 Deathjesters
3 Shadowseers (ML2 x3, Mask x1)
Troupe (10 players (2 kisses), Master (kiss))
Troupe (10 players (3 kisses), Master (kiss)) plus Starweaver
2 Skyweavers (glaives)
2 Skyweavers (haywire)
2 Voidweavers (prism)

Doesn't look much for your 1,750 points does it? Well you're getting 4 AV10 vehicles, 4 bikes, 3 large squads plus a Solitaire running around. That's not a lot compared to the DE lists we've been looking at. You could consider using a Revenger and a Blade formation together to get in some more vehicles at the expense of smaller Troupes (which could then fit in the Starweavers). I'm not convinced this will work particularly well on its own. Of course you're getting those re-rolls from the formation but I can't see that helping when there's tons of firepower coming your way. It's such a shame you can't get a Solitaire into a DE list more easily as I really want to try one out. Obviously you can spend less points and use a Masque but you don't get much from the DE portion once you have. Let's have a quick look though.

Dark Eldar plus Masque
This is a bit of a tight squeeze at 1,750 but let's have a go anyway:

Realspace Raiders Detachment
Archon (agoniser, shadow field, webway, Armour of Misery)
5 Kabalite Warriors in Venom
Raider
Razorwing Jetfighter

Masque Detachment
Solitaire (Rose)
Death Jester
3 Shadowseers (ML2 x3, Mask x1)
Troupe (6 players (2 kisses), Master (kiss))
Troupe (4 players (1 kiss), Master (kiss))
Starweaver
Starweaver
Voidweaver (haywire)

In this list two of the Troupes ride around in the Starweavers and the third gets the raider. As with the other lists I'm sure there are some optimisations to be made but it's a start to show you what can and can't be done. You can tone down the Archon quite a bit to get more stuff in, he's really only there for the webway so ditching the shadow field and agoniser is an option. Of course, with the raider you could ditch the webway altogether and hope you can survive to get close enough (Nightshields would help here). As a DE player it feels wrong to have so few Venoms and the list in general feels a bit Jack of all trades, master of none. You could always lose some of the upgrades and throw in some empty Venoms in Fast I suppose. As I said, it's a tight squeeze and I'm not sure it really works.

Conclusion
It's certainly possible to combine Dark Eldar with Harlequins. The Cast and Blade formations are obviously the easiest way. I'm not sure how good Harlequins are though without Rising Crescendo and decent numbers. You start to feel like you could get more for your points from Dark Eldar units. Either way, we're not talking about top tier tournament lists here as I'm not sure either codex is capable. Just like the Dark Eldar, Harlequins will take some finesse and skill to use in battle.

The unexpected standout list for me here is the DE plus Blade. The formation bonus for the Blade is a little wasted as if you're Jinking you're not firing Haywire but at times it might keep your units alive as they reposition. I really like the idea of having so much haywire against something like Necrons or Imperial Knights. Of course Necrons would make short work of the DE/Harlequin vehicles in response though.

A pure Harlequins force can work but I'm not sure how effective it would be. Let's not forget that if you go first you're likely to have Veil to protect your Troupes which could really help in getting them in combat safely. Although with just six plus D6 warp charge you might struggle to cast anything else.

I'm intending to play test the DE plus Cast and pure Harlequins lists. I'll be heavily proxying until I decide whether I like them or not. I've picked up a Troupe and Shadowseer and will probably grab another Troupe and a Death Jester at some point. I'll report back after my games in a couple of weeks. I hope this article has given you something to think about though. Sorry it's so long!

Sunday, March 15, 2015

Tournament Report - X-Wing Store Championship - The Outpost, Sheffield

Despite being determined that we'd keep X-Wing as a recreational game rather than a competitive one we gave in to temptation and attended our first tournament at the Outpost yesterday. Perhaps a store championship wasn't the best choice for our first X-Wing event but for once it fell on a weekend when both Matt and I were free and we hadn't already got 40K stuff booked in.

I was determined to keep my list simple so that there weren't any upgrades that I'd forget. I'm a huge fan of B-wings in our games so far (and Matt seems to hate them which is normally a good sign). I'd considering running 4 B-wings to make things as simple as possible but in the end I opted to swap out one of them for a pair of Z-95s. My squad looked like this:

Blue Squadron Pilot (B-wing) - Advanced Sensors
Bandit Squadron Pilot (Z-95 Headhunter)

This comes in at 99 pts. I'd considered playing around with it a bit to get bang on 100 pts but I decided that it might work in my favour to have initiative at some point. This list is great for me as everything is PS2 so I'm in less danger of smashing things into each other (as I get to choose the activation order). The whole squadron will go before Academy Pilots too in case I met a TIE swarm. Advanced Sensors help to make the most of that lovely two-speed koiogran turn too.

Of course, the strength of the list is that there's 32 hitpoints (19 of which are shields) and there's a formidable amount of damage output. There's no funky combinations or tricks though so it'd come down to how well I flew. I'm probably telling you things you already know though as these ships are hardly new releases. Speaking of which, Scum and Villainy were legal at this event and I was hoping to avoid them simply because I have no idea about them! Obviously the Y-wings, Z-95s and Firesprays aren't new ships but the pilot abilities and new upgrades are mostly a mystery to me.

Incidentally, Matt was running a Decimator and a Firespray but I can't remember much else about his list!

Round One - Rebels vs. Scum (Matt Lawton)
My opponent was running two Starvipers (Guri and an Enforcer) plus Kavil (Y-wing) plus a pile of upgrades I can't remember. Suffice to say I've never played against a Starviper so I had little idea of it's capabilities.


As this was my first competitive game of X-Wing I wasn't particularly optimistic. I lost a Z-95 pretty quickly and a B-Wing followed shortly after. It wasn't long before I took down the Enforcer though (mainly thanks to PS2 vs PS1) but that left me in a 27-49 hole with time running out. Matt kept the other Starviper out of the way but I managed to get a bead on Kavil and in the final round of the game I lucked out and brought him down. This gave me a 31 point boost and a 58-49 modified match win. It was a really enjoyable start to my competitive X-Wing career and great way to start the day. I was already doing better than I expected to do. Matt had an even better start though, winning his game 100-0 and finding himself on the top table.

Round Two - Rebels vs. Scum (James Hewitt)
James was running a pair of Firesprays (one of which featuring a lovely custom paintjob) with Kath and Boba at the helm. I deployed everything on one side of the board this time apart from one of the B-wings which I stuck on the left flank in the hopes of getting James to split up his ships. Fortunately for me he did so.

Kath finds a Z-95 in the way allowing the B-wings to get in at close range
The lone B-wing took heavy damage from Boba but on the other side of the asteroid field Kath was in a bit of trouble. I managed to get her to "bump" a Z-95 which gave me a chance to keep her in position. I followed this up with another bump from the other Z-95 which put Kath in a shooting gallery. I was unlucky with my first round of shooting though only taking a single shield. Fortunately I was able to keep putting the Z-95s in the way and barrel roll and koiogran my Bs to keep her in close range. She eventually took out one of the B-wings but it wasn't long before I managed to destroy her. James had forgotten his seismic charge which helped me a lot! I'd ignored Boba up until this point but he was now coming back towards me. Fortunately the game ended there though giving me a 50-25 match win.

Those pesky Z-95s keep Kath boxed in and barrels and K-turns keep the B-wings at range 1 to finish the job
Despite pointing out I didn't really know what I was doing I felt this was by far my best game in terms of my flying. A lot of it relied on luck in that I needed James to make particular moves to keep bumping but I was pleased with the way I flew this game, managing to keep most of my ships on a single target for so long made a huge difference. I just had to take pictures of a couple of my moves though as I was proud of how well they fell into place.

Round Three - Rebels vs. Rebels (Graham Saunders)
I found myself on table 3 where I really didn't feel like I belonged! Graham was running Chewy (YT-1300) and Leebo (YT-2400). It was pretty clear from the outset that he knew what he was doing too. His list had a great combination of upgrades that made Chewy seemingly invincible. He did give me a glimmer of hope though as he said that he often lost to "Rebel Swarm".


This game was pretty much over from the start as I deployed in the same way I had in the previous game. This gave Graham an easy B-wing kill early on and left the rest of my ships struggling to get into range. Slowly but surely I was chipping away at Chewy but I was losing my owns ships at a rather alarming rate too thanks to the 360 degree arc on both my opponent's ships. This eventually left a lone Z-95 clinging on for dear life but he sadly fell just before the time ran out. I'd brought Chewy down to 4 HP I think but obviously that was still a 0-100 match loss. Back down the tables where I belong then!

Game Four - Rebels vs. Scum (Tim Marsden)
Yet another Scum opponent but with another different list, Tim was running a pair of IG-2000s (B&C) with Advanced Sensors, Push The Limit, etc etc. The combination of upgrades and pilot skills meant it seemed like he could perpetually carry out several actions and have Focus and Evade a lot of the time!
Formation flying for the first time.
Suffice to say it was going to be tough to pin down these two ships. We deployed in opposite corners so I'd need to navigate the asteroid field to get there too. This time I deployed in a tight formation with my Z-95s out in front and a line of B-wings in behind. I was determined to try and use the Z-95s to block his ships as I had in the second game but with the boosts and general manoeuvrability of his ships I failed to pin him down.
Lit up like a Christmas tree but still not going down!
I wanted to focus my fire on one ship at a time but kept finding myself only able to shoot the ship I hadn't damaged as much. Eventually both IG-2000s had flown through my swarm and back away again taking a B-wing with them. The Scum ships were both down into hull but I could quite take either out. I'd got two Z-95s limping along on a single hull too. Time ran out before Tim could come in for a second pass though and I took a 0-25 match loss.

Game Five - Rebels vs. Scum (Dan Newton)
With my modified win in the first round I knew there was no chance I could make the cut for the championship rounds so my final game was just for pride. Sitting at 2 wins and 2 losses it would also determine whether I'd finish with a winning or losing record. Somehow I was again playing another Scum squadron but with yet another list. Dan was running 4 Y-wings, 3 with ion, one with another turret and some with a Scum upgrade that lets you fire both your Primary AND Secondary weapons! His entire squadron was PS2 like mine but my 99pts came into play giving me initiative and crucially first shot each round.


We both deployed in tight formations over on the same side of the board. This meant we probably only used about a quarter of the space available in a thin strip down the side of the field. The Y-wings move up pretty slowing making use of their 1-speed moves. After a couple of rounds of edging towards each other I decided to try something bolder and blasted one of my Z-95s forwards with a 4-speed move. This put me in a good position to block his advance. It worked well as the front line of his squadron both collided with my Z-95. This both protected the Headhunter and bunched up my opponent's squad. The following turn he attempted a koiogran with one of his Ys and misjudged meaning he couldn't complete the move. By now I'd got the B-wings into range despite all three of them receiving an ion token from some torpedoes.

Gradually I was able to focus fire and bring the Y-wings down one by one thanks to their similarly poor agility. There were a few further collisions on my opponent's part which really helped me keep the damage coming. Eventually I took down all four of the Ys whilst only losing on B and one Z of my own giving me a 100-37 match win to end the day.

As expected, I hadn't made the top 8 but I finished in a fairly respectable 12th to put me just inside the top half of the 24 player field. Two wins, a modified win and two losses is far better than I expected to do. Matt won 3 and lost 2 as well but managed to finish in the top 8 but sadly got knocked out in the first round of elimination against a list to which he'd already lost once.

Conclusion
Throughout the day people were telling me my list was a strong one with various people commenting that it was the kind of list they didn't want to play. I was pretty chuffed to have come up with something good off my own bat but it's hardly rocket science! I enjoyed playing the list, which is the main thing (for me at least). The B-wings are great fun to use and blocking with the Z-95s is satisfying when you can pull it off. I can't help but think A-wings are better in that role though. Perhaps I could ditch the Advanced Sensors and put in a couple of A-wings instead. Alternatively it has been pointed out that I could ditch the sensors and a Z-95 and run 4 blues and a bandit. Of course this is stronger in a lot of ways but I like my Advanced Sensors too much.

I feel like I played well in all my games. My deployment screwed me over in game 3 but I don't think it did much else that was particularly bad. In game 3 I did managed to hit an asteroid twice with a Z-95 though costing me both its shields. I then took a critical hit which turned out to be a Direct Hit losing me the ship pretty cheaply. The main thing I took away from today was flying in formation. It makes a huge difference to the effectiveness of the list and it's something I'll definitely be doing next time. Unless anything dramatically changes I think I'd run the same list again to be honest. At least I know what I'm doing with it.

I'd figured that with Scum only having recently been released there wouldn't be many people using them. I expected that I might perhaps play one of my games against them. How wrong I was! Four of my five games were against Scum squadrons. It was nice to see a variety of lists though. One thing that surprised me was how many people seemed to be running just two big ships. It's difficult to estimate but I think they accounted for over half of the lists. I might have to give my YTs more of a look in.

Generally speaking the X-Wing scene (from this limited experience) seems to be a closer knit community than the 40K crowd. Perhaps it's because there are less players but everyone seemed to know each other from previous events at various locations. They'd also all been playing for a while. All of my opponents were great guys though and there weren't any disputes to speak of at all. That's a pleasant change from 40K but I suppose it's because the rules are less complex/better written. I seemed to be just a table away from Matt several times though so we were lucky not to play each other.

I think I'll be dabbling in competitive X-wing again. If you'd asked me after the first couple of rounds I'd have definitely been coming back for more but rounds 3 and 4 showed me some of the complicated combos people can up with using the upgrade cards. Some of the stacking abilities get a bit daft in my opinion. I enjoyed the pace of the day though and even in round 3 when I was losing badly I knew it wasn't going to be too drawn out which is a welcome change compared to how 40K is sometimes.

Next weekend the six of us are meeting up again for a few friendly games of X-wing at Scott's house so I'm looking forward to playing some more relaxed games again.

LinkWithin

Related Posts Plugin for WordPress, Blogger...