Showing posts with label Imperial Guard. Show all posts

Monday, May 12, 2014

Battle Report - Tau vs. Eldar/AM (1,850pts)

In the run up to Blog Wars Matt and I always try to get a few games in with the scenarios to ensure there's no final tweaks that are needed. Last Sunday we played through Emperor's Relic with my BW6 Tau list taking on Matt's combination of Eldar and Guard (I just can't call them Astra Militarum). Matt's list was something along the lines of:

Karandras
18 Guardians (with wave serpent but not in it)
5 Dire Avengers (in wave serpent)
Two wraithknights with heavy wraithcannons
2 Leman Russ Eradicators (I think, the ones with the plasma cannons)
Coteaz
Warrior Acolytes
10 Veterans

Since this was Blog Wars 7 practice we'd be playing Emperor's Relic which is Vanguard deployment with a central objective with 10 VPs to either side and an objective each. Your home objective is worth 5 VP whilst your opponent's objective is worth 15 VP to you.
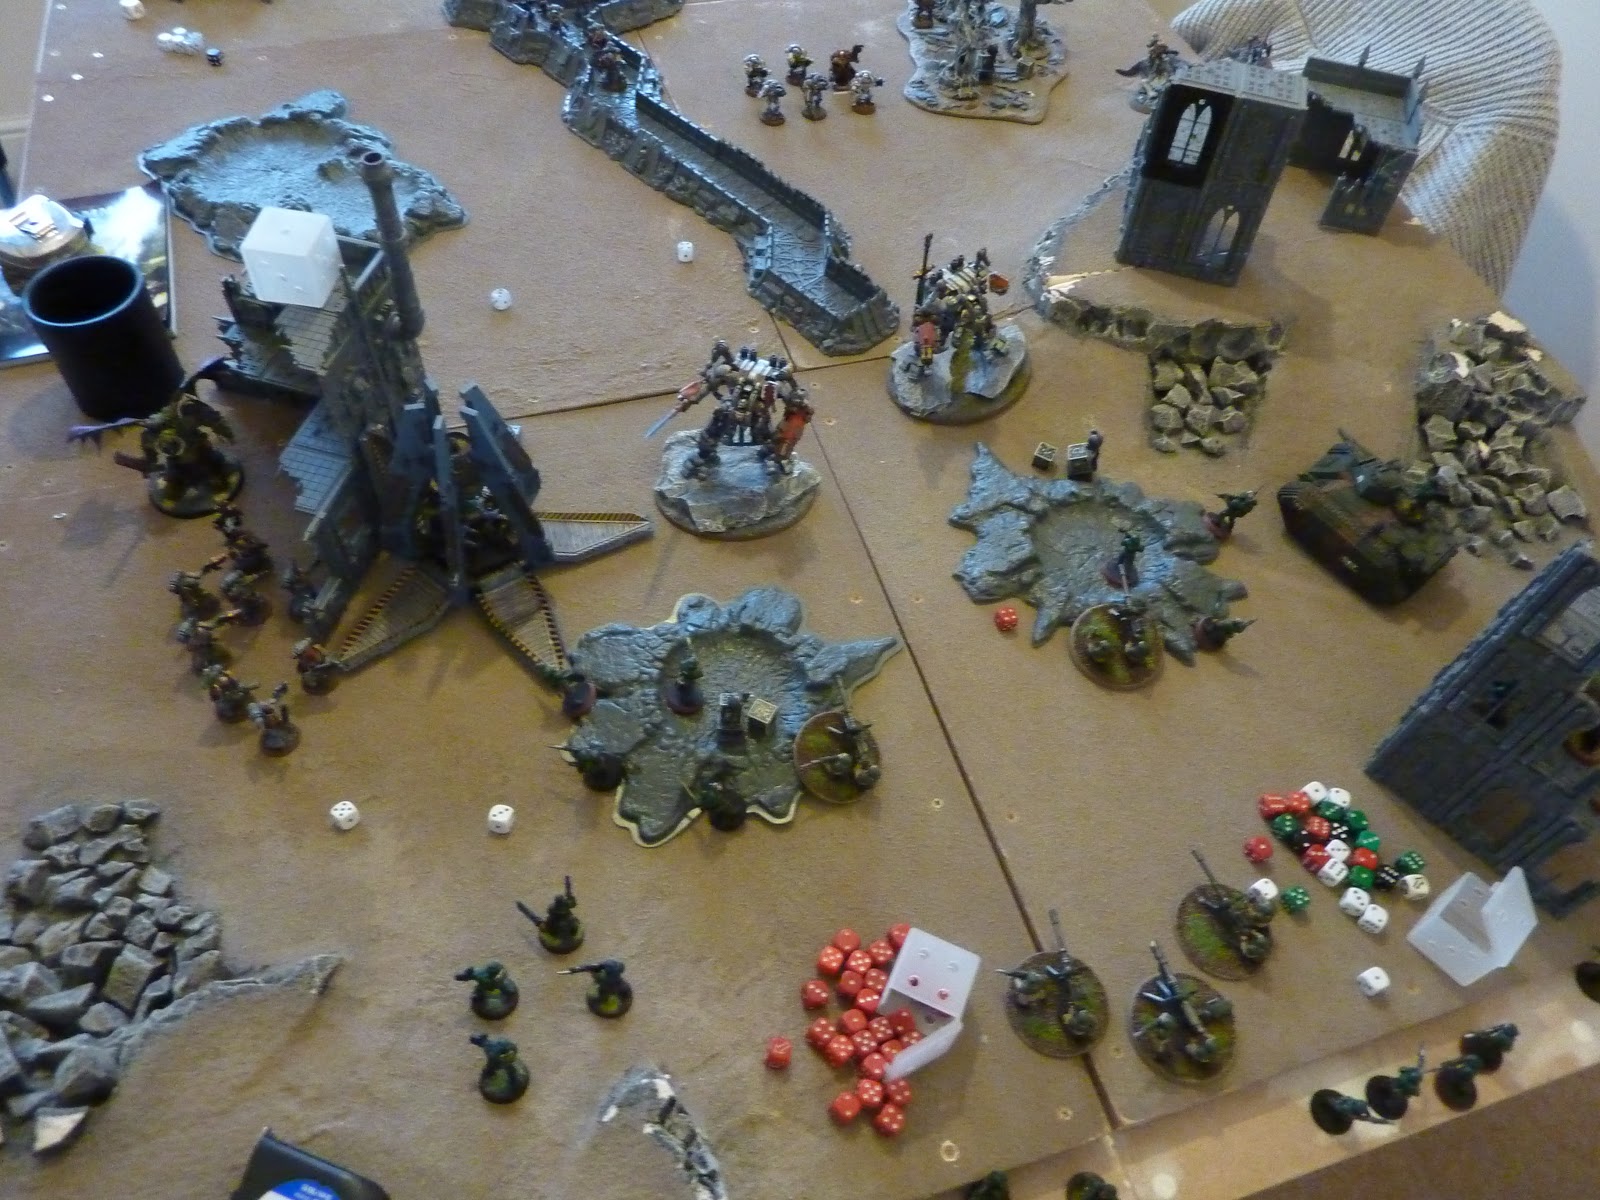
Battle Report
I got the first turn and made light work of one of the wraithknights with a combination of crisis missile team and riptides. That's a heck of a start! Meanwhile Karandras had infiltrated on my flank so I began to send my devilfish in his direction. Matt's first turn was focussed on taking out my pathfinders with two of the squads being killed off an the third reduced in number.

Shadowsun arrived at this point but couldn't risk deepstriking so close to the leman russes and opted to target the wave serpents. I rolled a hit which would've actually allowed me to hit the AM tanks but hindsight is always 20:20. Anyway, Shadowsun shot one of her fusion blasters at the empty wave serpent whilst the rest of her team focussed on the occupied one. The empty one passed its Jink save but the other blew up with fire from the rest of my army killing all but one of the dire avengers in the crater. Meanwhile the fire warriors piled out of their transports to hit Karandras and his guardians. Fortunately for me the warlock had failed his Conceal power so they'd only benefit from Karandras' stealth. This allowed me to wipe the entire squad out including Karandras giving me Slay the Warlord thanks to the Kroot who'd arrived behind them. In the meantime the rest of my army focussed on the wraithknights apart from one of the riptides who attempted to use his ordnance blast to down a leman russ but failed. This left the wraithknight alive and close to Shadowsun.

Matt began his second turn with Coteaz attempting to cast Prescience and Forewarning on the Leman Russes. Somehow he managed to double-six both rolls meaning not only did the powers fail but he also left Coteaz on a single wound! This was of little consolation to Shadowsun though who found herself smacked down by the wraithlord. She'd have been fine if she'd not be caught in a Sweeping Advance as on her own she'd have been able to use Our Weapons Are Useless (since the crisis suits had been killed). She was caught though giving Matt Slay the Warlord too. Her death certainly saved either the leman russes or wraithknight next turn.

The remaining fire warriors hopped back in the transports to try and survive long enough to grab some objectives. More Kroot arrived but Coteaz informed them that he'd been expecting them and eight of the ten were gunned down as they walked on the field.

I eventually managed to kill off the other wraithknight but not before one of the riptides had bought it. I'd failed miserably on a couple of occasions to kill the tanks so they rolled in and opened up on the riptides. Matt realised at this point that he'd been forgetting to fire their lascannons which probably would've resulted in the death of the riptides a turn or two sooner.

A combination of fire warriors and drones managed to finish off some acolytes and Coteaz who broke off to try and kill the Ethereal's squad. The game ended soon after at the top of T5 with me controlling my own objective whilst Matt's veterans held his. Neither of us could keep the central one. With all three secondaries I'd scored 8 of the possible 33 available VPs.

Conclusion
Had I focussed on the wraithknights on the second turn instead of worrying about Karandras I'd have probably saved Shadowsun and the game would've been over far sooner. Still the game felt pretty one-sided at the start with me killing a wraithknight straight off. Well at first it did anyway. With me exposing the fire warriors early I lacked anti-infantry firepower late on to deal with the veterans. The kroot were stupid to arrive in range of Coteaz but I simply forgot despite Matt having reminded me once that he had that rule.

Still, it was great that the game ended up pretty close towards the end. Matt was in a position where he might've taken the central objective himself were it not for my drones getting lucky. Obviously I was pleased to win the game but the main thing to take away from this battle was how well this mission works. You've got to have some way of getting to your opponent's objective if you want to score well. Even though I killed off a good chunk of Matt's army I only scored 8/33 points. You've got to push for the objectives sooner to clear them or have some way of getting to them earlier to claim them. It's certainly an improvement on both Relic (which normally comes down to First Blood) and Emperor's Will (which usually involves holding your own objective and again comes down to First Blood).

Having the objectives worth more points makes the secondaries fairly inconsequential. Sure you can both just hold on to your own objectives but then the winner will only be scoring 8 VPs. As you know I'm a big fan of quantifying victories. I don't like straight W/D/L but prefer to know just how significant a victory (or indeed loss) actually was.

We got three games in so there's another couple of reports to come. The next one involved a few big guys....

Thursday, May 01, 2014

New Imperial Guard Codex (Astra Militarum) - Warlord Traits, Orders, Heirlooms and Army Bundles

The rumours were true and what we once knew as Imperial Guard will now forever be referred to as the Astra Militarum. Well, realistically everyone will still call them "Guard" but nice try GW. Anyway, the new codex is another of the now very familiar 104-page format. There's a decent chunk of fluff at the front of course but the notable thing for me is that, despite the rumours, GW haven't done away with everything except Cadians. I can only assume these rumours were based on the Militarum Tempestus book or something.

With the exception of Orders there aren't really any army-wide special rules which is the same as the old book. Of course, being a new codex there is a dedicated Warlord Trait table and as I'm sure you've seen in the rumours by now there are some new orders available along with some changes to existing ones.

Warlord Traits
The first thing to note is that tank commanders can only take the first three traits (which makes sense when you read them). I have to say that as trait tables go the AM one is pretty solid. You're getting Outflank for D3 units, Preferred Enemy for his unit (although only for one codex which is an issue against allies I suppose), a morale bubble which is better than most other books, Relentless for his unit, the ability to give orders or extend order radius/give an extra order. I can't really see any of them being particularly weak. Obviously Relentless is only useful for certain units but still there's a strong selection here. 

Voice of Command (Orders)
Orders work in a similar way to before with the unit receiving the order need to pass a leadership test to accept it. As before the unit must shoot immediately (although "immediately" isn't actually spelled out) and a double 6 prevents and further orders being issued that turn. What's different though is that a double 1 doesn't give a free order but rather means that subsequent orders from that officer are automatically successful. Difficult to say if that's an improvement or not as frankly a 1/36 chance of it happening is hardly game changing. 

There are now 9 orders with the first 6 available to any officer but the last three limited to Senior Officers (who can issue two orders). Here's a quick rundown:
  • Take Aim! - Precision Shot special rule
  • Smite at Will! - Split Fire special rule
  • First Rank, Fire!, Second Rank, Fire! - extra shot for lasguns and hot-shot lasguns
  • Forwards, for the Emperor! - unit must Run after shooting
  • Move! Move! Move! - Runs with three dice (as before)
  • Suppressive Fire! - Pinning special rule
  • Bring it Down! (Senior only) - Tank Hunters and Monster Hunter special rules
  • Fire on my Target! - Ignores Cover special rule
  • Get Back in the Fight! - regroups/unpins a unit which can then act normally
Bring it Down has therefore changed from twin-linked and First Rank, Second Rank now specifically includes hot-shot lasguns and Fire on my Target now completely ignores cover rather than a re-roll. Otherwise, the old orders are the same. The new ones could be pretty useful though particularly Take Aim and Forwards for the Emperor. It's a shame that Incoming! has gone but a lot of the time units are getting +2 for going to ground anyway e.g. behind Aegis lines or in area terrain.

Next, it's worth looking at who can actually issue orders and at this point it's worth noting that Chimeras still allow orders to be issued from inside. Anyway, here are the guys doing all the ordering:
  • Company Commander (Senior Officer)
  • Platoon Commander
  • Tempestor Prime
  • Yarrick (Senior Officer)
  • Creed (Senior Officer, 3 orders with re-rolls)
  • Straken
Finally, there are new Orders available for Officers of the Fleet and Tank Commanders. The Navy Orders (OotF) basically offer reserve manipulation but the Tank Orders are always issued at Ld9 and are as follows:
  • Full Throttle! - Flat Out with 6+D6" even if Heavy
  • Gunners, Kill on Sight! - basically Split Fire for the Tank Commander
  • Strike and Shroud! - allows smoke launchers to be used after shooting
Not hugely useful but I can see that extra smoke coming in handy for the Tank Commander's unit. I'll discuss orders further when I talk about the possible combinations in my units reviews but I thought this overview would be helpful.

Heirlooms of Conquest
Like all of the new books the AM codex has some special wargear. Most of the time these things are overpriced for what they offer but let's give them the benefit of the doubt and take a look:
  • The Tactical Auto-Reliquary of Tyberius - allows all doubles to count as Inspired Tactics. Not hugely useful for the cost especially when only two orders are issued per turn. Also has possibly the longest name for a piece of wargear ever!
  • The Laurels of Command - good in combination with Get Back in the Fight! but still pricey and situational, 6" isn't much of a range to be useful
  • Kurov’s Aquila - a 6" Preferred Enemy bubble is always nice but there's a whopping points premium to pay for the privilege 
  • The Blade of Conquest - pretty expensive for what is effectively a master-crafted frost blade but not totally useless.
  • The Emperor's Benediction - decent way to spend those spare points I suppose. Precision Shot is a bit of a weird rule for it to have though when it can only be taken by Characters who get it anyway!
  • The Deathmask of Ollanius - actually reasonably priced considering you get 4++ and IWND. Fear, as we know, is pretty useless though. Obviously EW would be nice but you can't have everything.
As ever then these are mostly overpriced. The SM  (or should that be Adeptus Astartes) book actually had a decent selection which makes these look a little weak in comparison. Guard haven't ever really been about fully tooled up elite units though so I can't say it's a big loss.

New Army Bundles
Finally, it's worth noting that there's a couple of new army bundles available with the launch of the AM codex. There are two Defence Forces one for Cadians and the other for Catachans. Both contain essentially the same models but with different clothes on and both are on sale for £100. Depending on how you add up the individual cost of the units you could save up to £33.50. Obviously buying the Heavy Weapons teams in the triple pack and getting some cadians with your chimera brings this saving down a bit but still it's worth thinking about if you're new to Imperial Gua...err... Astra Militarum. 

There's also a the Hammer of Cadia which gives you three Hellhounds, three Leman Russ battle tanks and a Hellhammer. This set offers a saving of £66 against the individual sets! If you're fancying a wall of tanks then definitely worth thinking about although you may want a different Baneblade variant. Still this trend of offering bundles with the new codices is welcome, even if it effectively means the "battleforce" now costs £100!

Tuesday, January 29, 2013

Battle Brothers Game 2 - Titanic Fenrisians vs. GK/IG

Top of turn 2 - not much left to kill
We were looking around the room at the start of the day and to our relief there weren't many lists with flyers in them. Unfortunately, we managed to get some anyway! This time we'd be playing Dawn of War and Emperor's Will. Our opponents Darren and Sean (Crusade of the Lost Souls) were fielding (from memory/pictures):

Primaris Psyker
10 Veterans in a Chimera
Manticore
Vendetta
Aegis line with comms relay

Coteaz
3 Warrior acolytes
2 big squads of death cults and crusaders
Techmarine
2 stormravens

This was going to be tough. Our best chance of winning was to wipe out the Imperial Guard before the flyers could arrive and win by default. If they managed to get even one of the flyers on it was going to be VERY difficult.

Battle Report
We again got first turn and with Coteaz cancelling Coteaz they didn't manage to Seize. This would give us two turns to kill off the guard before the flyers and the nastiness inside arrived. We deployed everything in a similar fashion to game 1 and they stuck 3 acolytes on top of a derelict bastion with the aegis line abandoned (they used a wall of martyrs as you can see in the picture). The chimera and manticore went on the other flank. 

So we knew what we had to do. The drop pod came in and unfortunately only wrecked the chimera. One dreadknight jumped forward and incinerated the acolytes on top of the bastion (able to hit level 3 thanks to being a jump unit - worth remembering). The dreadknight managed to incinerate a handful of guardsmen but they passed their leadership test. Lucky for us they were pinned thanks to their emergency disembark (the back door of the chimera was against the table edge). The manticore killed the drop pod and a handful of grey hunters. We now had turn 2 to get rid of a handful of guardsmen and the manticore. This was achieved with a combination of the outflankers arriving (a bit too early for my liking) and blowing up the manticore and then the dreadknight killing off the guardsmen with help from the grey hunters without needing to charge. 

So far so good really. We'd have preferred to kill everything on turn one but they had just enough on the board to stop this happening. Even so if by some chance they didn't get a flyer on we'd still win at this point....

Obviously they managed it with one stormraven and the vendetta coming on. We'd deliberately placed our army as far forward as possible to try and make it difficult for them to hit us. So this is where the argument comes in. The vendetta wasn't really an issue but the stormraven was going to be easily able to kill our dreadknights thanks to Mindstrike missiles. They brought it on at a pretty shallow angle but when they started to shoot at our dreadknight I questioned whether or not it was in their arc. I've already talked about the argument but suffice to say once the ref had ruled in their favour it all started to go wrong. They managed to hit with all their shots and with help from the vendetta they dropped the dreadknight. Now obviously it's difficult to know how significant this was but I'll get to that in the conclusion.

Why would we do this? No matter how good it looks.
With the flyers on the board our only hope for killing them was the psycannons or charging them when they hovered. Matt got off Prescience and fired the psycannons at the stormraven. Sadly although he hit twice he failed to penetrate only scoring a glance I think. We were pretty worried about the loss of the other dreadknight and the fire from the flyers hurting the thunderwolves so we stuck them together in a ruin. I decided this looked cool so took a picture and ironically it allows me to show you our biggest mistake of the tournament.

They hovered the stormraven and vendetta whilst the second stormraven blasted on. With them hovering our wolves and remaining dreadknight should easily gimp them with S10 attacks. Sadly we'd put them right next to each other allowing the deathcults to drop out and multi-charge. Granted we forgot they shouldn't have got the charge bonus but with rad grenades and hallucinogen making us Initiative 1 it wasn't really going to end differently and we were easily wiped out. 

This picture pretty adequately shows our problem here.
From this point forward we were left with only one chance. With our Coteaz now dead (thanks to the other Stormraven - which we'd again failed to kill) they'd got Slay the Warlord and would easily have Linebreaker. We'd got First Blood and Linebreaker. If we were lucky we could keep the second squad of deathcults (with Coteaz) away from our objective and use the Space Wolves to contest theirs giving us a 5-2 win. Slim chance but you have to play for it.

Sadly it didn't pan out. The grey hunters failed to move far enough through terrain to get close enough to contest and the death cults swept through our lines and contested our objective. With the other deathcults on their objective they took victory 5-2.

Conclusion
A very hotly contested but enjoyable game. The only reason for this was Sean and Darren's good humour about the argument. I'm not sure Darren was quite as amused as Sean but even so they could've been a lot more hostile and made the game miserable to finish out. We had a great laugh with them and it was easily our closest game all weekend. 

All over from this point forward
Ignoring the debatable dreadknight kill, the deathcults definitely won the game for them. We threw it away by leaving our two best chances of killing the hovering flyers so close to each other. From that point on we were clutching at straws and never really had much chance of winning. We were unlucky not to down the second stormraven once we'd hit (although it still isn't likely with S7 vs AV12). 

Once the guardsmen and tanks were dead the space wolves didn't really take part in the battle. The grey hunters spent most of their time out of range of everything and the thunderwolves were cut down easily in combat with the deathcults. They stuck their objective centrally which really hampered our outflanking. I don't think we did too much wrong (except what I've mentioned) and we left the game feeling cheated by a frankly incorrect decision. 

Nethertheless we'd taken 2 points despite losing and even if it had been Swiss pairs we'd have expected to be in this position after game 2! Once again, thanks to Sean and Darren for an enjoyable game even if it was for strange reasons!

Thursday, January 03, 2013

First Gaming of the New Year

Matt was over today for our first gaming session of the new year. We managed to fit in two games of 40K and two bloodbowl matches. Here's a brief rundown of the games.

Game 1 - SW/GK vs IG/Daemons (40K) - 1500pts
As testing for the Battle Brothers tournament at the end of the month we pitted our Titanic Fenrisians against IG with daemon allies. The game was The Scouring on Hammer and Anvil deployment. I took the first turn with the SW/GK.

A drop pod slammed down near one of the traitor guard's chimeras. The occupants made short work of the transport and the occupants took casualties in the explosion causing their nerve to break. The two dreadknights teleported forwards and incinerated further heretical infantry. The bloodthirster and daemon prince arrived in Matt's first turn. The bloodthirster scattered leaving him impotent for a turn. The daemon prince incinerated 5 grey hunters with its Breath of Chaos. Fire from the guardsman wounded one of the thunderwolves.

The purifiers who'd been advancing up the centre failed to blow up the remaining chimera meaning the thunderwolves were forced to charge it to destroy it. The grey hunters in the centre managed to shoot down the deamon prince and cause it a wound as it slammed into the ground. The dreadknight set it alight but caused no damage. The resulting combat saw the dreadknight defeat it over a couple of turns. The other dreadknight incinerated a heavy weapons team. The thunderwolves took casualties to the guardsmen who'd been evicted from the chimera. The bloodthirster then easily finished off one of the dreadknights. A little while later it did the same to the other dreadknight.

The thunderwolves only killed a single guardsman in combat and somehow managed to die in the process. This would be the turning point of the game. The plaguebearers arrived on a 4 pt objective controlled by some warrior acolytes. Over the remaining turns the vendettas arrived and dealt some damage. The bloodthirster killed off the purifiers and with the grey hunters struggling to shift the plaguebears the match was comfortably won by Matt's army.

Game 2 - Orks vs Humans (Bloodbowl)
As a bit of a warmup to remind ourselves of the rules we played the classic matchup of humans and orks. My humans struggled from the start with me failing crucial rolls left right and centre. The orks scored one touchdown in each half and I struggled to even make a consolation point. The problem I have is that I'm simply not used to playing games with passing teams as I usually favour dwarves or orks.

Game 3 - DE vs IG/CSM - 1750pts
Matt fielded a typhus zombie horde, 57 strong, with a heldrake, obliterators, daemon prince, vendettas and plenty of guardsmen in support. I'd be fielding my current favourite DE list with Duke Sliscus and trueborn in a raider, 2 wych raiders, 3 kabalite venoms, 3 ravagers and 9 reavers. I managed to get a free pain token for my Combat Drugs and also seized the iniative which filled me with hope, at least at first....

The ravagers did what they always seem to do for me and missed most of their shots (I think the forget they're BS4). They could only wound the daemon prince once. The trueborn and the venoms were equally pathetic and only managed to kill a handful of zombies. The return fire from the guardsmen killed a venom and two raiders but with minimal casualties. The wyches were charged by the daemon prince and failed to cause any wounds resulting in their deaths after a second round of combat.

In their second turn the reavers swept from their position on the left flank and hit the guardsmen on the quad gun with bladevanes wiping out the squad. The ravagers continued to be pathetic but between them and the kabalites they did at least kill both of the obliterators. The rest of the army continued to chip away at the zombies. The remaining wyches had managed to avoid being charged by the second horde and therefore easily wiped out an infantry squad. They were then successfully charged by the horde and finished off over a few rounds of combat. The reavers were easily eradicated by the daemon prince and things were starting to look bad. Duke Sliscus and co. were evicted from their raider and hit by the heldrake's baleflamer. The remaining trueborn managed to kill more zombies but little else before they were wiped out by a second blast from the now hovering heldrake.

The DE vehicles were slowly picked off by the guardsmen and with me now lacking the firepower to kill off 30+ zombies in time the relic was safely out of my reach. The only consolation might be that Duke could kill Typhus in combat if he made enough Shadowfield saves. Despite taking Typhus down a couple of wounds Matt kept passing 5++ saves and eventually Duke's shadowfield flickered out and he was instantly killed.

Game 4 - Dwarves vs Skaven (Bloodbowl)
Hoping to at least come away with one victory from the day I was pleased when Matt failed on two successive turns to pick up the ball. I was able to keep the rat ogre down with my troll slayers (though kept failing to break through his armour) and capitalised on Matt's fumbling by scoring a touch down.

Over the next few turns I was able to smackdown more rats and things were looking good as we neared half time. With the final act of Matt's turn 8 he managed to pick up the ball within 4 squares of his endzone, run forwards and throw a long bomb (needing a 6 which he did thanks to a Pass re-roll) to another rat who unbelievably caught the ball despite being in two tackle zones and then dodged out of the tackle zones and went for it twice to score! That's a pretty ridiculous amount of luck on Matt's part and at the half way point I was shocked that the score was tied.

In the second half more gutter runner shenanigans saw me going a goal down. Sadly we ran out of time shortly after but by this point Matt had injured both of my runners and I was struggling to keep on top of his agile rats with 9 men.

Conclusion
Well that's a hell of a start to my gaming in 2013. Nothing from 4 games! I think the Bloodbowl games were actually pretty close on reflection and both were pretty enjoyable with some great moments. It's made me more determined than ever to get my dwarves painted up and start playing more games. They're nearly finished so hopefully I'll get photos up this weekend if I managed to get them done.

It's a shame I couldn't have won with the dwarves. The main problem was with armour rolls. I put down rats left, right and centre but you know things are going badly when you've got more dwarves injured than skaven!! Back to the xbox for some more practice I think!

The 40K games were prett demoralising really. Both felt like they were promising early on but reached a turning point after which I felt like I had no chance of winning. Granted this is normally me attitude in 40K and I accept that it's part of the problem but still I can't say I enjoyed the games.

The zombies have met a mixed reception on the internet. Some think they're brilliant whilst others see them as a gimick that doesn't work in competitive play. I have to say that particularly in games with minimal objectives (especially Relic) they're nigh on unstoppable. If you don't have templates of some description then you'll struggle to chip away at them. Granted I was using mostly 4+ poisoned fire so some armies would find their T3 less of a problem. My wyches really needed a bit more punch to deal with them in combat and S3 didn't really cut it.

As with any horde they require a large volume of fire to put down. The difference with these guys is not only do you have to shift 30 bodies but also they're Fearless. Now, I think the changes to the Fearless rules are the biggest mistake in the 6th edition book. Allowing units to gain a significant benefit from a rule without an obvious downside is always frustrating. In 5th edition you could hope to cause a lot of casualties in combat but now you can settle down for a looooong slog to try and whittle them down.

Well let's just hope that my second day of gaming in 2013 (tomorrow with Jamie) works out a bit better or I might have to rethink this hobby malarky!!

Tuesday, April 17, 2012

Open War 17 Battle Reports - Tau Undefeated! (Part 2)

Yesterday was my birthday so I'm posting these a little later than planned. I got a bit carried away with the report from the first battle so I'll try to keep the remaining two brief. Here goes....

Game 2 - Tau vs Imperial Guard
Drawing the first game put me firmly in mid-table. I was worried that I'd meet something a bit off the wall so was pretty pleased to be facing Dan's Imperial Guard. I'm always pretty confident against IG because I can usually beat them for both range and accuracy. Dan had 5 veteran squads in 2 vendettas and 3 chimeras with a command squad in a fourth chimera. These were joined by 3 Leman Russ and a couple of sentinels which would outflank.

We'd be playing Dawn of War and Annihilation. Dan's list probably edged mine for KPs but there wasn't much in it. Luckily for me I'd be shooting first but the table contained a frankly horrific amount of line of sight blocking massive buildings. This would really hamper both of us but I decided (after much deliberation) I'd rather be the one hiding behind them then letting my opponent stay out of sight and force me to close range. With all those veterans and melta/plasma I'd want to keep them at arms length. Nethertheless I elected to deep strike my commander teams in the hopes of getting melta shots on his tanks and then charging the occupants with my S5 suits. Obviously with it being DoW neither of us deployed anything so we proceeded to walk on in turn 1.

Dan walked on everything but his sentinels and since the latter only had scatter lasers I wasn't too worried about them as long as I kept my devilfish moving. My first broadside team to shoot blew up both vendettas straight away and the resulting explosions killed off half of the veterans inside. One squad was pinned but sadly both held their nerve and didn't flee. The rest of my shooting was less successful but Dan's response was equally unlucky with his Leman Russ's failing to find range or scattering off target (which was the story for the rest of the game.

Dan's sentinel arrived in turn 2 and failed to hurt the nearby devilfish with shooting and only shaking it in combat. They soon fell victim to the nearby missile team. The next few turns saw one of my commander teams deep-striking in, killing a leman russ and then taking a crapload of melta/plasma fire leaving a single suit on his own. He tried to kill a chimera but failed with shooting and assault leaving it stunned. He obviously died quickly after. On the right flank I pushed my devilfish forwards and rapid fire, helped by the pathfinders, easily dealt with the veterans that were without their transports. Dan eventually managed to kill off a devilfish but at the end of turn 6 (no random game length in this mission) the game was most definitely a whitewash. The only thing that survived was half a veteran squad who would've died had I not snake-eyed my battlesuits move through cover roll and missed out on an assault.

Conclusion
One of those games that isn't good for either party as my army did what it does best with disgusting efficiency. Dan stayed in a good humour about it though and it was enjoyable all the same. After a devastating first turn from me Dan understandably played a bit cautiously. I think if he'd advanced his army and got his melta/plas vets into range in their chimeras it could've been very different. The full points from this game would definitely propel me to the top tables.

Game 3 - Tau vs Orks
Feeling a bit light-headed playing on table 3 with my Tau I was surprised to find I was pitted against Orks. Looking at the results table I was a little gutted to have narrowly missed out on playing another IG army but knowing that trukks died easily to my army I was still fairly happy. My opponent, Andy, shared my philosophy of bringing something fun along rather than a hardcore tournament list (although with hindsight his list was still very competitive). He had Ghaz with meganobz in a battlewagon, 2 deffkoptas, 3 units of boyz in trukks and Zogwort with a pile of nobz in a final trukk. We'd be playing a VP mission with control points that gave 100 VPs per turn they spent being controlled.

If I could get first turn this could be over pretty quickly. Of course I didn't manage it so I knew I find myself in combat by turn 2. In a surprising turn of events Andy managed to blow up one of my devilfish with his deffkoptas and stun the other (thanks to me failing cover saves). Thanks to L-shaped deployment one of the boyz mobs hit my pathfinders on turn 1 (stupid of me to put them that far forwards really). However, Andy was most excited about the prospect of turning my commanders into squigs and the first time he tried it he rolled a 6 and I failed to match it meaning I was now the proud owner of a bright red squig. Undeterred I decided to make the most of my new "assault" unit and sent him in the direction of one of the deffkoptas. Miraculously he held the deffkopta to a drawn combat which was nice.

Elsewhere my army did as expected and blew up pretty much every transport in the ork army. The only exceptions were Zogwort's trukk which was immobilised and the empty one which I ignored. One of the boyz mobs was pinned and took a few casualties from the nearby fire warriors. The squad which had killed the pathfinders was cut in half by some more fire warriors since I'd decided to keep them out of their transports to give me all the firepower I could get.

Turn 2 saw the inevitable Ghazghkull Waaagh! and the result was that Zogwort's nobz got a multi-charge on my stunned devilfish and commander team. Zogwort found time to make this commander into a squig too (he only rolled a 3 but I obliged with a 2, much to Andy's delight). Needless to saw I lost both the transport and the command team. Ghazghkull inflicted some overkill on some more Tau as well. However, all of that paled into insignificance when my squig managed to take down the previously wounded deffkopta!!! He then went and hid for the rest of the game to keep hold of the commander's VPs!

My army slowly picked off all of the orks apart from the nobz and meganobz (with their special characters in tow). The rest of the game would basically be me playing keep-away with JSJ moves and hoping to gun down the orks or at least pin them/make them run. Both nob mobs killed a broadside team each and then set about chasing the rest of my army around. Zogworts squad resisted a lot of fire thanks to Cybork bodies and FNP. Andy made a disgusting number of 5+ saves I'd like to point out! I was still pretty sure I could keep them at distance though and I'd scored 200 VPs from the control points. Both of his squads were pricey though so at least one had to go. Ghaz spent the game chasing a missile team around eventually killing one of them with shooting but taking no casualties since he never failed a 2+ save!

Zogwort's nobz were chasing the squig's crisis bodyguard (without their commander of course), missile team and a devilfish full of fire warriors. I was content in the knowledge that they'd not be able to charge me until Zogwort rolled a 6 for a well timed bonus Waaagh! Of course Andy rolled a 6 to run and caught the bodyguard team for a costly amount of VPs. With no other options I had to disembark the fire warriors and hope that with help from the 'fish and the missile team they'd force they gun the nobz down or at least force them to run. There were only 4 orks left in this team with Zogwort on 3 wounds, 2 klaw nobz with a wound each and the painboy with both his wounds. I just needed to kill one of them to force a morale check. After all my shooting (and some more sickeningly good saving throws) the 4 orks were still there with a wound each left. I should've insisted on making Andy assign the wounds properly as he rolled for all 4 on the same colour dice and then chose to put the wounds on Zog and the painboy but he'd let me off with stuff so I'd have felt harsh doing it. Totting up the VPs we found that with the help of the control points I'd managed to hold Andy to a draw with only about 100 VPs between the two armies. I finished in 16th just above the halfway mark.

Conclusion
This game was really frustrating thanks to bad luck on my part and amazing luck for Andy. That being said it was never going to be easy going second against Orks but I felt I put in a good show. The clincher of the whole thing was that bonus Waaaagh! which came just at the right time for Andy to catch my suits. Without it the bodyguard would've surely killed them off and won me the game.

Can't complain too much though since Andy was a great guy to play and it was a fantastic game with some really random orkyness which I loved (even though it hurt my army a lot). Coming away from a tournament knowing that you were undefeated with a Tau army is pretty satisfying. Knowing that the difference between drawing and victory was as simple as a dice roll is less than satisfying!! It didn't make my performance any better when every other person reminded me that a Tau player had won the 40KUK GT last month!

Time to retire the Tau for now and try out my Dark Eldar at Blog Wars 3. Before I put them away I'll post up some after action thoughts on Tau tactics and my list in general. Hopefully tomorrow but we'll see if I get chance.

Thursday, June 09, 2011

Blog Wars Painting Competition (pic heavy)

Thought I should throw up a few photos of the painting competition. Hopefully the guy who had an SLR has taken some better ones that I can put up at a later date but for how here's what I took: Let's start off with my favourite special character (apologies to Belial!). This is Draigo painted by Scott (but in Matt's army):
Here's more of Scott's work in the shape of his chaos army with his SC Abaddon in the foreground:
I really like the colour scheme of this Tau army:
 Wazdakka Gutsmek and his ork horde (not the tau looted wagon):
Here's some shots of Bully's (SoS) Belial (who won the SC painting competition) and the rest of the DA force:


Jamies from Index Astartes' Blood Angels:
 More Blood Angels (yellow ones!!) from Andy at Claws and Fists:
The winning Imperial Guard and Elysian armies:

And finally, a few more of the rest:

Sorry if I've missed your army out but sadly I didn't have time to get photos of them all. Hopefully once I receive some from other people I'll be able to post them up. Check out all the blogs listed on the Blog Wars page for more.

Monday, June 06, 2011

My Blog Wars Battles

As I mentioned yesterday my performance at Blog Wars was a little embarassing. Nonetheless I enjoyed all three games and learned a lot from the battles that I had. Here's a brief report of all three and what I took away from them.

Game One - Space Wolves vs. Orks (Darren - C&F)
So with one participant dropping out at the last minute we drafted in Darren from Claws and Fists and extremely short notice. He threw together an Ork list featuring Old Zogwort as his special character. We only started about 15 mins late which was good. The first game was Capture & Control with Spearhead deployment. Not one that traditionally makes for an exciting game. 

Summary
Darren deployed and went first keeping his deffkopta, grots, meganobz and warboss in reserve. He advanced his army towards me and had a pretty typically Orky round of shooting, managing to immobilise one of my rhinos. I piled my land raider forwards and proceded to hammer him with long fang fire. I scored 4 hits with frags on one squad picking off a good chunk of orks. The rune priest lined up a jaws attack which killed a shoota boy, power klaw nob AND Old Zogwort. I was only able to stun his looted wagon though which would prove crucial. Ragnar and co. got into combat on the first turn comfortably annihilating a mob but a whopping 1" consolidation move meant I was left a little stranded. After a promising start things started to go against me. 

Darren brought in his kommandos and unfortunately my long fangs held on meaning they'd be safely in combat in my turn. The stormboyz polished off a lone wolf and his warboss, mob and meganobz put out a flurry of power klaw attacks which made short work of Ragnar and his bodyguard pack. I was still feeling fairly confident as I had my land speeder in a good place to contest his objective and still had two grey hunter packs to pull back to claim mine. The rune priest tried to jaws 2 boyz, a PK nob and his warboss but all four passed their initiative tests!

Over the next couple of turns I killed off his stormboyz and kommandos and pulled a grey hunter squad back towards my objective. On the other side of the field I again failed to hurt his looted wagon and my land raider fell to power klaw attacks. Just before the final turn I lost my land speeder and with it any hope of contesting his objective. I desperately tried to pull back to my own objective but meganobz caught one squad and a looted wagon battle cannon shot found my other pack stranded. All three models failed their cover save and now my only hope for a draw was if my long fangs could make his grots (that had come on from reserve) run. Since they had a healthy cover save I could only manage to kill a couple and the game ended there 1-0. I only had a three long fangs left which mean Darren score 1,685 VPs to my 1,1170. 

Conclusion
Hoping to wipe out enough Orks with Ragnar meant that I wasn't too worried about my objective in the early stages. Ragnar didn't do as well as I'd hoped (partly because I forgot his Warrior Born attacks - despite Gav from C&F reminding me). I should've positioned myself closer and let him come to me firing at him all the time. My land speeder should've stayed in cover the entire time and only come out to contest at the last minute.

Game Two - Space Wolves vs. CSM (Rich - Cupboard of Nurgle)
I felt pretty confident facing CSM as I've played Scott's plenty of times and I feel like I know them quite well. Unfortunately, we got Dawn of War and Annihiliation. 

Summary
Thanks to the crappy deployment I struggled to find a good position for my long fangs. One squad was in cover but a bastion in the middle of the field gave them little fields of fire. The other squad ended up out in the open so they were hit hard by Rich's defiler which I struggled to take down, allowing it to survive til around turn 4. 

On my left flank Rich advanced Kharn and his berserkers. I placed my land speeder right behind the rhino as bait and sure enough he disembarked to have some shots at it. He was unable to do anything thanks to the cover save but now Kharn was ripe for some heavy flaming to the face. With that and some fire from a nearby grey hunters squad I'd thinned them out nicely for my lone wolf to have a go at Kharn. He weathered the attacks and managed to get two chainfist hits on Kharn. I'd only need twos to force Rich to pass a 5+ save or suffer instant death. Brilliantly I rolled a double 1 and Kharn lived to fight on (but not until he'd killed a couple of his own). 

Elsewhere Ragnar had disembarked from the redeemer ready to assault some plague marines who had parked their rhino in the open. A combination of assault cannon, krak missiles and meltagun fire could only stun the rhino leaving Ragnar stranded. If I could keep him alive I knew he could do some damage so I was pleased when Rich had an unsuccessful round of shooting. Ragnar and a handful of grey hunters charged into some plague marines and newly arrived deepstriking terminators. Ragnar single handedly killed off the plague marines after a few had succumbed to melta and bolt pistol fire. The rest of the squad killed a single terminator but were finished off by his buddies. Ragnar spent two phases trying to kill them off (I forgot Warrior Born AGAIN) but was ultimately killed with a power weapon.

On the left the grey hunters made short work of Kharn and his remaining berserkers and the remaining grey hunter squad held out against the other berserkers with help from a nearby lone wolf. One Ragnar was gone Rich was able to steamroll through my army leaving only half a pack of hunters, some lone wolves and a rhino standing at the end of turn 5.

Summary
I had some terrible dice rolls, my long fangs may as well have been Orks. Ragnar couldn't hit a barn door and Rich had some amazingly good rolls, passing tons of terminator invulnerable saves. Both of us agreed that my appauling luck was the deciding factor in the game. 

For me it all game down to the snake eyes roll from the lone wolf against Kharn who then finished off the loner and not been able to pop that rhino for Ragnar to get off a full charge. The defiler survived too long but that was largely down to me wasting the land speeder on Kharn's squad. I think Rich felt pretty guilty about some of his rolling but sometimes the dice just go your way!

Game Three - Space Wolves vs. Elysians (Tim - A Guardsman's Guide to Glory)
Having barely moved up from the bottom table I was surprised to find myself up against what is essentially an IG list. Needless to say they were gorgeous models and Tim went on to share the best painted army prize. With two squads of long fangs and plenty of meltas/fists I was confident I could deal with the 6 flyers he was fielding (not sure where I'm getting this confidence mind you!). The game was Seize Ground (5 objectives) with Pitched Battle deployment. 

Summary
I secured the crucial first turn and got some great positions for my long fangs. The land raider would secure the middle field and I had a rhino on each flank with a lone wolf in support. Tim only deployed a couple of vendettas, his commander in a little buggy thing and a scanner squad. 

I made short work of one of the vendettas and the scanner squad (which allows one unit to re-roll to hit). Ragnar ordered his land raider forward to wipe out the survivors and proceded to kill off another squad who disembarked from the other vendetta. Tim brought on sentinels and vultures to make mincemeat of my long fangs. The vulture's twin-linked punisher cannon (20 S5 shots) easily killed off one long fang squad but the sentinels couldn't kill a single space wolf. I brought in a lone wolf to help the long fangs finish off the walkers and the long fangs returned to their positions unharmed. Ragnar and co. sat on an objective and took pot shots and the remaining vendetta. 

Elsewhere one of my rhinos was destroyed and the other immobilised. The wrecked rhino meant I was forced to disembark right in front of the vultures. Luckily I was able to shake one of them with living lightning so a few grey hunters survived and made a run for the objective in the middle. My lone wolf on that side reduced a valkyrie to rubble and in the subsequent turned charged it's occupants and forced them to flee. The other valkyre came on near the surviving long fangs and struggled to kill them. The lone wolf chased the valkyrie around eventually being in position to kill a couple of the occupants and chase them off after the grey hunters had wrecked the flyer. The land raider charged back to mid field and it's assault cannons brought down a vulture (the other had lost it's punisher cannon).

At the end of my turn 5 I'd killed or was chasing off all of Tim's troops and was holding 3 objectives. Tim moved in his vulture to contest the one near the long fangs, vendetta to contest Ragnars and the last remaining grey hunter in the centre was no match for the fire from the sentinels and command vehicle. At the end of Tim's turn 5 all the objectives were either unclaimed or contested. With a turn 6 I could use my grey hunters melta fire, lone wolf and long fangs to at least kill one of the flyers and secure the win. Tim passed the dice to see if we got a turn 6 to his girlfriend who rolled a 1 sealing my fate.

Summary
My luck changed in this game with some very lucky shots on the flyers. However, Ragnar's squad and the land raider really needed to kill the other vendetta but failed ultimately costing me the game. I'd focussed on his troops but ignored the flyers' ability to contest. I can be nearly certain turn 6 would've changed that.

I think my main mistake was that when one of the rhinos was immobilised I left the grey hunters inside hoping to claim an objective late on. With their melta fire earlier they may have killed off the other valkyrie and therefore I'd have won in turn 5.

Overall
I can't really complain about my list. The lone wolves were fantastic (if a little unlucky with Kharn) and in all three games made some crucial kills. The rune priest did his job with some nice jaws and lightning attacks. Ragnar could've been a lot better if I'd remembered the Warrior Born bonus attacks but I never seem to remember them! Grey hunters are always reliable, as are long fangs.

I didn't really make the most of the land speeder in any of the games. I decided to bring it on at the start instead of deep striking it. The idea being that it would be another target and hopefully my rhinos would survive longer. I was too indecisive about it's targets. In the ork game it should've hidden and contested, in the chaos game the defiler should've been melta'd and in the final game it should've been on the other side of the table killing vultures.

I picked up a Dark Eldar Battleforce and Archon to make the most of the tournament discount so next time around I might be defecting....

Friday, June 03, 2011

Special Characters at Blog Wars

Well with the tournament only about 36 hours away and my army pretty much finished I thought I'd share with you a list of the special characters which will be making a (mandatory) appearance at the tournament. For those who didn't know every list has to include a special character. The reason for this was to try and encourage people to use "friendlier" lists which has, for the most part, been successful. It's encouraged people to try out new things and it'll certainly make the games more interesting in most cases. Anyway, in attendance on Sunday will be *drumroll*:

Ragnar Blackmane (mine, Space Wolves)
Draigo & Inquistor Coteaz (Grey Knights)
Abaddon the Despoiler (CSM)
Corbulo (Blood Angels)
Njal Stormcaller (Space Wolves)
Commander O'Shovah (Tau Empire)
Wazdakka Gutsmek (Orks)
Belial (Dark Angels)
Kharn the Betrayer (CSM)
Logan Grimnar (Space Wolves)
Knight Commander Pask (Imperial Guard)
Sergeant Harker (Imperial Guard)
Harker & Marbo (Imperial Guard)
Colonel Straken (Imperial Guard)
Mephiston, Lord of Death (Blood Angels)
Baron Sathonyx (Dark Eldar)
Justicar Thawn (Grey Knights)
Kharn the Betrayer (CSM)
Marshal Helbrecht (Black Templars)
Marneus Calgar (Ultramarines)
Chief Librarian Tigurius (Relictors a.ka. Space Marines)
Kaldor Draigo (Grey Knights)
Doom of Malantai (Tyranids)
Bjorn the Fell Handed (Space Wolves)

As you can see there aren't too many duplicates. There's 2 Kharns, 2 Draigos and a couple of Harkers. Rather pleasingly there's 4 different Space Wolves characters which you can read more about using the links on the right. The eagle eyed amongst you will have noted that there are only 24 on the list. This is because one Tau player and an Elysians (Forge World) player have used their option to be exempt from the requirement. This shouldn't affect things too much I hope but that remains to be seen.
As I've mentioned before there'll be a competition for best painted SC. This means it's worth putting a few extra details on to their models even if you don't have time to do it for the rest of your army. It also means that those two players will unfortunately be unable participate in that part of the competition. There's plenty of other prizes on offer though. With potentially 9 prizes available that means hopefully a third of the people there will get their entry money back! Not bad I reckon. Obviously, some jammy sod will end up winning more than one prize. I must point out that I'll not be eligible for any of the prizes to ensure my impartiality which is a shame because I could do with some Maelstrom cash! It also means you get a 3 in 25 chance of scooping a raffle prize!

Anyway, some (possibly) interesting data on the armies attending. There'll be 5 Imperial Guard players (roughly a 20%) which is no big surprise because they remain a strong tournament army and with their cheap special characters it's easy to write a Blog Wars list. There's 4 Space Wolves, 2 BA, 3 CSM, 1 DA, 1 BT, 2 vanilla and 3 GK lists which means a total of 16 power armour armies or just under a third. There's therefore 69% loyalist Imperial armies. The remaining 5 armies are Orks, Dark Eldar, 2x Tau and Tyranids. There's quite a bit of variety then but there's good chance you'll play Space Wolves or Imperial Guard. Not really surprising given it's an SW blog and IG are always popular at tournaments. I'm really pleased to see a couple of Tau lists as they were my previous army before SW. I'm very thankful to Venerable from SoS for bringing DE in the end as I'm considering them next.

That means the only codexes not represented are Eldar, Necrons, Daemons and Witch Hunters. Sad there's no Necrons because I've never played them but since they're one of the oldest codexes it's hardly surprising. Daemons would probably have been represented by Darren from C&F who sadly isn't attending. There's often a couple of Witch Hunters armies at bigger tournaments though as they remain pretty competitive. At one point there was going to be an Eldar list but that player changed to CSM at the last minute after he discovered they aren't that great any more! Bit of a shame since I've got an Eldar army tucked away.

Hope someone other than mean found all those stats interesting. Tune in tomorrow for pictures of my (hopefully) completely painted army for Blog Wars! I promise there aren't too many more Blog Wars related posts coming up for those who are sick of hearing about it!

Friday, February 25, 2011

Warhammer 40,000 Doubles - Painting Competition (pic heavy)

On the Saturday the judges went round looking at all the armies and deciding on which should be shortlisted for public judging on the Sunday at lunchtime. GW elected to display the judges shortlist of 10 armies in glass cases which was great for presentation but not so good for photography so I apologise in advance. Here's our favourite. 

The reason we liked it so much is that you genuinely felt that they'd just come back from a battle in somewhere resembling Afghanistan. The weathering is just right and some of the details like the blurred power sword are nice touches.


Our second favourite was this Orks army with some amazing conversions such as mono-where Ork bikers. This went on to win the competition and you can clearly see why:


Finally, the best of the rest (again I feel very jealous that my painting is nowhere near close to this standard):


LinkWithin

Related Posts Plugin for WordPress, Blogger...