Thursday, January 31, 2013

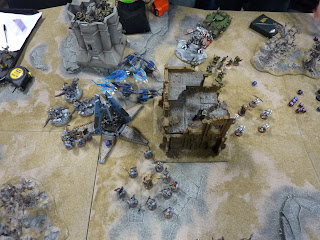
Battle Brothers Game 4 - Titanic Fenrisians vs. Orks

Our first game on the second day of the tournament saw us facing Will and Andy and their Ork army. We'd be playing Crusade (3 objectives) on Hammer & Anvil deployment. Before I get into their list it's worth mentioning that the Will in question is Will Hayes of Forgeworld. The man responsible for some of the best Forgeworld models including the titans, Tau Manta, a lot of the Ork stuff. It seems, looking now that he's actually design most of the stuff on the FW site!! Talented guy, that's for sure.

Anyway, onto the battle itself after that spot of man-love. WIll and Andy were fielding (again from memory and getting hazy at this point):

Warboss on bike w/ klaw
Old Zogwort
2 large boyz mobs
4 nob bikers with painboy
8 or so warbikes
2 dakkajets

Battle Report
We won the roll off (yet again) and decided to go first. We deployed pretty much identically to how we had in all our games. Dreadknights, TWC and purifiers in the middle right on the edge of our deployment and everything else in various forms of reserve. Will and Andy deployed one boyz mob with Zogwort on their left flank with the rest of their army over towards the right. They rolled for their controlled objective and got a Skyfire Nexus which would come in handy later as the dakkajets were, of course, in reserve.

I brought the drop pod down in front of Zogwort hoping to gun down a good number of orks. I managed to kill 7 which was about average and would help a lot in the inevitable assault. The dreadknights teleported forwards and incinerated a few bikers but could only score a single wound on the nob bikes. Everything else just advanced as fast as possible.

In return Zogwort unleashed his psychic potential. He got off his psychic attack and rolled "Frazzle" which is an S6 AP3 blast. I'd failed to spread out my grey hunters and when he hit with the template I took off 7 models. I was whilst I was doing this that I remembered Deny the Witch and, much to Andy's frustration, I rolled a 6 and promptly put the models back (it was good of them to allow us to do this). The rest of the mob made up for it though by managing to kill 5 grey hunters with shooting after I failed all but one of my saves. 

In the centre, the nob bikes drove straight round the two dreadknights and lined themselves up to charge the thunderwolves. Their shooting managed to kill the storm shield bearer outright and the resulting charge was just as effective. With their Hammer of Wrath attacks they were able to kill another wolf! I was left with my power fist which, with its S10, should be able to cut down a few bikes. Unfortunately, I only managed to hit with one attack and the return hits from the powerklaws made short work of the wolves giving our opponents First Blood. 

Elsewhere, Andy was asking about the dreadknights and sighing every time we told him about their rules. In particular the fact that they're characters. This makes them excellent in challenges. He also wasn't pleased about them being S10 AP2 and striking at normal initiative. We pointed out that Will should take it up with Matt Ward next time he saw him. Needless to say, being Orks they warboss still charged and quite rightly challenged leading to his swift demise. This made his remaining warbikers flee the field. The large ork mob charged the remaining drop pod hunters and miraculously they survived and killed a few orks in the process. 

The purifiers were able to gun down the nob bikers without the need to charge them. The combination of the wolf priest's preferred enemy fire and the dreadknight was enough to not only kill off a fair chunk of the remaining boyz mob but also kill a biker and force them to continue fleeing. The remaining boyz were cut down in an assault from the dreadknight. Meanwhile Zogwort and co. were finishing off the grey hunters. One of the two dakkajets arrived and put some wounds on the purifiers. Brilliantly, Matt had put Coteaz at the front who was lucky not to be insta-killed by the supashooters. 

The dreadknights headed over to help finish off Zogwort and his boyz. Matt attempted to gun down the dakkajet but could only strip a hull point. However, he had, at least, managed to make him Evade. This saved the wolf priest's grey hunters from getting gunned down. They responded by using the skyfire nexus to full effect and blowing up the stricken dakkajet. The second dakkajet arrived and this time was able to gun down Coteaz and a couple of purifiers thanks to a Waaagh! volley. A ranged attempt to down a second flyer from the Wolf priest's squad managed to inflict a Locked Velocity result. This meant that he'd need to move 36" in the next turn. Whilst all this had been happening we'd been merrily walking on our warrior acolytes onto an objective. The dakkajet was forced to zoom over their heads though and would fly off in the next turn. Our opponents conceded here and with two objectives in our control we secured a solid 8-2 victory.

Conclusion
To be fair to Will and Andy this was the sort of army that will always struggle to deal with ours. They were pretty unlucky to give us a skyfire nexus but by that point it wasn't likely to matter as at some point the dakkajets would either leave the table or else not be in a position to shoot us. 

They did give us a scare though. The loss off the thunderwolves was a shock and had I not made that Deny the Witch roll the grey hunter pack would've succumb to orky shooting and hence Zogwort's mob would've been much stronger when they met the purifiers/dreadknights. To be honest there was no need to put the drop pod that close and frankly I perhaps should've focused more on the objective that we never managed to secure. In a tournament where absolute victory points are being recorded, this is the kind of thing that makes a big difference. From their position on the flank, Zogwort's mob would've had to slog it over to our lines whilst we were dealing with everything else. 

This was certainly our most visually stunning game. The Forgeworld ork bikers (designed by Will I think) are gorgeous models and their painting had certainly done them justice. The dakkajets were both beautiful examples too. They were quite rightly nominated for the best painted army (more on that soon).

Another thoroughly enjoyable game for us. I'm not convinced Will and Andy had much fun as we told them about the, frankly ridiculous, dreadknight rules!

Wednesday, January 30, 2013

Battle Brothers Game 3 - Titanic Fenrisians vs. Daemons/CSM

Middle of Turn 1
Another thing we were hoping to avoid that we hadn't seen much of around the room was big units of screamers and flamers. You can guess what Pyro and Pus had then can't you? Alex and James were running (again from memory/photos):

Chaos Lord with mark of Nurgle, fist, terminator armour.
2 lots of plague marines (i think one lot of 5 and one 7-8 man squad)
Havocs with autocannons and mark of nurgle
Predator with Las/Auto

Herald on a disc
9 flamers
7 screamers
2 squads of plaguebearers

This time we'd be playing Relic on Vanguard deployment. A lot of high toughness in there but the CSM half of the army wasn't too much of a threat to us at range. We'd struggle to kill units off very quickly and would probably end up victim to the screamers and flamers. We were relieved they'd restricted them to one squad of each though because of the Daemons being the allies. We didn't get first turn this time around and failed to Seize but it actually helped....

Battle Report
They deployed the havocs on top of a derelict bastion (I wish GW would stop giving our opponents these) with the plague marines in front and the predator off to their left. I elected to walk my wolf priest and his grey hunters this time to have as much shooting on the table as early as possible. We otherwise deployed in a similar manner to the previous games.

Bottom of Turn 1
They put the plaguebearers in their preferred wave and dropped one on the relic with the other not far away.  Their shooting was pretty ineffective but managed to wound the dreadknight. In retaliation we brought the drop pod in centrally (to allow us easy access to the objective) and went after the smaller plague marine squad killing 3 with rapid fire from both grey hunter packs. One dreadknight went after the plaguebearers on the relic without needing to shunt whilst the other went after the other plaguebearers in a similar fashion. We wanted them locked in combat in case the screamers/flamers arrived so were quite pleased when we didn't kill many plaguebearers despite ignoring FNP. They'd probably not last another turn though so we'd have cut their scoring units in half. We'd also secure First Blood in the process.

The screamers came down (but the flamers didn't) and luckily for us they scattered away from our army. This meant they were restricted in what they could use their sweep attacks on being forced to hit the grey hunters and not killing many. We hoped the lord would take the bait and charge the dreadknight. He'd be forced to challenge it and with S10 we hoped to insta-kill him and then stay locked with the plague marines/bearers and slowly cut them down. Sadly, in what was becoming a trend for Matt. The dreadknight in question wasn't the one with the sword. He still managed to get 2 wounds through meaning it'd be 5++ saves for the lord or instant death. He failed one and we were about to celebrate when, thanks to the 5 plague marines cheering him on the lord got a re-roll and passed it. This allowed him to easily kill off the dreadknight in return with his power fist. Gutted.

Mid Turn 2
Bit of a blow but all was not lost. With the greatsword the dreadknight wouldn't be so unlucky and by killing a couple of plague marines first we'd get rid of that irritating re-roll. Anyway, before all that the grey hunters were in combat with the plague marines, killing them over a couple of turns, and the thunderwolves swept round to charge the screamers. We were pretty sure we knew it would end badly for them but needed to hope we could at least thin them down about or else hold them in combat. We didn't want them zipping around sweeping us and killing marines in combat.

Whilst Matt was finishing off the lord easily this time the thunderwolves charged in. I forgot hammer of wrath (as I did every game except the last) but killed off 3 screamers nonetheless. In return Alex was incredibly unlucky. He only managed to get through 3 wounds despite S5. This meant I only lost a single wound thanks to my shield and I'd cut down their effectiveness significantly. The purifiers cut down the remaining plaguebearers and left Alex and James with very little. The flamers still hadn't arrived in turn 3 which meant that if we could clear the board they'd have nothing left and the flamers would never show up.

To do this we needed to kill the predator, remaining screamers and the havocs. We were pretty confident about the tank and the screamers but the havocs would be tricky to shift. They were stuck up on top of the derelict bastion. We could shoot them with the grey hunters and incinerate them with the dreadknight but we'd be unlikely to kill them. The dreadknight could charge the building too but with them on the ramparts S3 hits weren't likely to harm them much and frankly neither was the jump down.

We cut down the screamers with help from the grey hunters and the purifiers got rid of the predator easily enough. The other grey hunters failed to kill any havocs and the dreadknight only got two of them. The dreadknight charged the building but despite destroying it it wasn't an explosion. The havocs took no damage from the building's demise and passed their leadership test.

The flamers were guaranteed to arrive in turn 4 but Alex and James decided that they wouldn't change the course of the game much. Sure they'd kill a squad easily enough but then our entire remaining army would hopefully have enough shots and attacks to do them in and the acolytes were on the relic at this stage. For this reason they elected to concede giving us a 6-0 win as we'd secured all 3 secondary missions.

Conclusion
Had the flamers arrived sooner and the screamers come down more accurately this game could've been very different. As it was it wasn't really that close. We were unlucky to lose a dreadknight in combat challenge with the lord but they were equally unlucky with their screamers against the thunderwolves. This doesn't really change my opinion of either unit as they weren't taken in big enough numbers to cause the problems that they normally do. I think Alex and James played a good game and the scoreline doesn't reflect this at all. The only thing I'd have done differently I think would be to put the screamers and flamers in the preferred wave as you want them in quick to do as much damage as they can and keep us pinned back.

The plaguebearers coming in first actually worked to our advantage allowing us to lock the dreadknights in combat and take an easy First Blood in the second round of melee. Had they been coming down later on and contesting the relic and killing acolytes then things may have worked out differently.

We'd finished the day with a maximum number of VPs in our final game (well you could just about get more if you had a warlord trait with the bonus - but still). We therefore would be going into day 2 feeling much better than we had down after game 2. We were still concerned about facing more flyers though.....

Tuesday, January 29, 2013

Battle Brothers Game 2 - Titanic Fenrisians vs. GK/IG

Top of turn 2 - not much left to kill
We were looking around the room at the start of the day and to our relief there weren't many lists with flyers in them. Unfortunately, we managed to get some anyway! This time we'd be playing Dawn of War and Emperor's Will. Our opponents Darren and Sean (Crusade of the Lost Souls) were fielding (from memory/pictures):

Primaris Psyker
10 Veterans in a Chimera
Manticore
Vendetta
Aegis line with comms relay

Coteaz
3 Warrior acolytes
2 big squads of death cults and crusaders
Techmarine
2 stormravens

This was going to be tough. Our best chance of winning was to wipe out the Imperial Guard before the flyers could arrive and win by default. If they managed to get even one of the flyers on it was going to be VERY difficult.

Battle Report
We again got first turn and with Coteaz cancelling Coteaz they didn't manage to Seize. This would give us two turns to kill off the guard before the flyers and the nastiness inside arrived. We deployed everything in a similar fashion to game 1 and they stuck 3 acolytes on top of a derelict bastion with the aegis line abandoned (they used a wall of martyrs as you can see in the picture). The chimera and manticore went on the other flank. 

So we knew what we had to do. The drop pod came in and unfortunately only wrecked the chimera. One dreadknight jumped forward and incinerated the acolytes on top of the bastion (able to hit level 3 thanks to being a jump unit - worth remembering). The dreadknight managed to incinerate a handful of guardsmen but they passed their leadership test. Lucky for us they were pinned thanks to their emergency disembark (the back door of the chimera was against the table edge). The manticore killed the drop pod and a handful of grey hunters. We now had turn 2 to get rid of a handful of guardsmen and the manticore. This was achieved with a combination of the outflankers arriving (a bit too early for my liking) and blowing up the manticore and then the dreadknight killing off the guardsmen with help from the grey hunters without needing to charge. 

So far so good really. We'd have preferred to kill everything on turn one but they had just enough on the board to stop this happening. Even so if by some chance they didn't get a flyer on we'd still win at this point....

Obviously they managed it with one stormraven and the vendetta coming on. We'd deliberately placed our army as far forward as possible to try and make it difficult for them to hit us. So this is where the argument comes in. The vendetta wasn't really an issue but the stormraven was going to be easily able to kill our dreadknights thanks to Mindstrike missiles. They brought it on at a pretty shallow angle but when they started to shoot at our dreadknight I questioned whether or not it was in their arc. I've already talked about the argument but suffice to say once the ref had ruled in their favour it all started to go wrong. They managed to hit with all their shots and with help from the vendetta they dropped the dreadknight. Now obviously it's difficult to know how significant this was but I'll get to that in the conclusion.

Why would we do this? No matter how good it looks.
With the flyers on the board our only hope for killing them was the psycannons or charging them when they hovered. Matt got off Prescience and fired the psycannons at the stormraven. Sadly although he hit twice he failed to penetrate only scoring a glance I think. We were pretty worried about the loss of the other dreadknight and the fire from the flyers hurting the thunderwolves so we stuck them together in a ruin. I decided this looked cool so took a picture and ironically it allows me to show you our biggest mistake of the tournament.

They hovered the stormraven and vendetta whilst the second stormraven blasted on. With them hovering our wolves and remaining dreadknight should easily gimp them with S10 attacks. Sadly we'd put them right next to each other allowing the deathcults to drop out and multi-charge. Granted we forgot they shouldn't have got the charge bonus but with rad grenades and hallucinogen making us Initiative 1 it wasn't really going to end differently and we were easily wiped out. 

This picture pretty adequately shows our problem here.
From this point forward we were left with only one chance. With our Coteaz now dead (thanks to the other Stormraven - which we'd again failed to kill) they'd got Slay the Warlord and would easily have Linebreaker. We'd got First Blood and Linebreaker. If we were lucky we could keep the second squad of deathcults (with Coteaz) away from our objective and use the Space Wolves to contest theirs giving us a 5-2 win. Slim chance but you have to play for it.

Sadly it didn't pan out. The grey hunters failed to move far enough through terrain to get close enough to contest and the death cults swept through our lines and contested our objective. With the other deathcults on their objective they took victory 5-2.

Conclusion
A very hotly contested but enjoyable game. The only reason for this was Sean and Darren's good humour about the argument. I'm not sure Darren was quite as amused as Sean but even so they could've been a lot more hostile and made the game miserable to finish out. We had a great laugh with them and it was easily our closest game all weekend. 

All over from this point forward
Ignoring the debatable dreadknight kill, the deathcults definitely won the game for them. We threw it away by leaving our two best chances of killing the hovering flyers so close to each other. From that point on we were clutching at straws and never really had much chance of winning. We were unlucky not to down the second stormraven once we'd hit (although it still isn't likely with S7 vs AV12). 

Once the guardsmen and tanks were dead the space wolves didn't really take part in the battle. The grey hunters spent most of their time out of range of everything and the thunderwolves were cut down easily in combat with the deathcults. They stuck their objective centrally which really hampered our outflanking. I don't think we did too much wrong (except what I've mentioned) and we left the game feeling cheated by a frankly incorrect decision. 

Nethertheless we'd taken 2 points despite losing and even if it had been Swiss pairs we'd have expected to be in this position after game 2! Once again, thanks to Sean and Darren for an enjoyable game even if it was for strange reasons!

Monday, January 28, 2013

Battle Brothers Game 1 - Titanic Fenrisians vs Tau/Eldar

Deployment
Our first random game of the tournament was against a team called "Smells like Fish, Tastes like Chicken" otherwise known as Tom and Fin who'd brought an allied force of Tau and Eldar. We'd be playing Purge the Alien on Hammer and Anvil deployment. They had a pretty much totally shooty army so the long ways deployment played into their hands. Their list consisted of:

Eldrad
2 x 5 Ranger pathfinders
3 War Walkers with scatter lasers
5 Fire dragons
Shas'el with plasma/missile pod
12 Fire warriors in a devilfish
Piranha
2 Broadsides with TAs and shield drones
Aegis line with quad gun

Battle Report
We managed to get first turn and decided to reserve the acolytes to avoid easy kill points along with the two squads of hunters one in a pod and the other outflanking. Everything else was as far forward as possible to close the distance as soon as we could. With their Aegis line already on the board we had a rough idea of where they would deploy. The broadsides would be a problem for the thunderwolves as they'd be instant killing them if I failed shield rolls.

Our opponents dropped one squad of pathfinders on their right flank with the Tau contingent of devilfish, suit and piranha in the centre. Everything else was clustered behind their aegis line. Interestingly they decided to delpoy their war walkers rather than reserving them. They attempted to Seize but came up short so we began the game.

Top of Turn 1
The drop pod slammed down in front of the Aegis line with the occupants walking over the barricade but only 4" meaning a struggle to get models across the line. The grey hunters let rip with fire at the broadsides. Thanks to being in behind them they were able to kill both drones and one of the suits. Great start. The two dreadknights teleported forwards and incinerated the fire dragons and exposed pathfinders on the right. Sadly Matt rolled a single 1 on both sets of wound rolls so we were denied first blood. Elsewhere Coteaz and the wolves ran as fast as they could up the centre using some ruins to hide them from view. Amazingly all three squads (pathfinders, fire warriors and broadsides) passed their leadership tests. Shame.

It was around this point that I forgot to keep taking photos so my details might get sketchy from here on.

The fire warriors disembarked from the devilfish and with help from the remaining fire dragon and broadside they were able to reduce the grey hunters to a couple of models. The war walkers were given Prescience and therefore managed to kill a dreadknight out right giving our opponents the precious First Blood VP. The rangers with Eldrad along with the commander and piranha attempted to do the same to the other dreadknight but Matt was better with his saves this time around. Although we'd lost the dreadknight we were pretty confident that we'd still have enough to do the job.

My grey hunters outflanked at this point and thanks to Acute Senses I managed to get them on the side I wanted. They walked on between the war walkers and the broadside. One of the two guys left from the original drop podding hunters jumped on the quad gun and with help from his mate with the plasma gun managed to drop the sole remaining broadside. The guys who'd outflanked let rip with their rapid fire on the war walkers. They'd already taken damage from somewhere (I said it'd be sketchy!) but the grey hunters were able to destroy the whole squad with one exploding and taking the remaining fire warrior with it (bonus!). Meanwhile the dreadknight incinerated some fire warriors. The purifiers were able to blow up the piranha but the thunderwolves failed their charge on the devilfish. With very little left already our opponents could do very little in return.

Anyway, the thunderwolves eventually managed to charge both the devilfish and firewarriors easily dealing with both. The outflanking grey hunters fired their pistols at Eldrad. I had thought about rapid firing to avoid having Eldrad kill my wolf priest in a challenge for an easy point. However, our opponents accused me of being afraid of him so I geared up for a charge instead. I shot down a couple of pathfinders and then charged in. Eldrad challenged the wolf priest and, in their words, he was too afraid of Eldrad to accept. The rest of the squad easily killed off the remaining pathfinders and Eldrad too. The dreadknight charged down the commander and you can imagine how that ended. At this point (the bottom of turn 3) our opponents had a single pathfinder remaining so they understandably conceded.

With their first blood kill of the dreadknight they scored 2 pts but the overall score was 12-2.

(EDIT: I think I've merged turn 2 and 3 together here somehow but I hope it still makes sense).

Conclusion
The aftermath
We knew once we got to our opponents lines they'd struggle to stop us. They were fantastic guys to play and despite us taking a long time to think about things and play it right they were patient. I don't think we did much wrong in this game. Sure we got a bit of luck with a couple of things but the only problem we had was Matt's ability to roll 2+. The two incinerator shots both had a 1 on the wound which denied us First Blood and then he fluffed 3 2+ saves on the dreadknight which led to our opponents stealing First Blood instead.

I don't think we can really complain with 12-2 as a start in the tournament though and with absolute VPs as the scoring method we were off to a good start.

I have to say the photos aren't doing their Tau army justice. They were painted on a commission by a friend of Tom's (I think) but Matt has the guys details so if either Tom or Fin want to post them on here feel free. They were a pleasure to play against. Also got some great tips about photography afterwards so I'll soon be investing in a light tent and I'll let you know how that goes.

I really think this was one of those rock vs scissors games. They needed to keep us away as long as possible but that's pretty much impossible with our list! Either way I don't think the result was because we did anything special. The only thing that was surprising was the choice to swap out Eldrad's powers. The one with 3D6 minus leadership hits on a squad was effective but I have to think that Prescience isn't any better than Guide and Fortune would've helped out some of his units. Obviously not having first turn didn't help them though. I suppose this was the reason they deployed the war walkers so that they'd get the most out of their fire power.

Sunday, January 27, 2013

Battle Brothers Tournament (40K Doubles) Report - Overall

I'll throw up battle reports on our progress at this weekend's Battle Brothers event and the best painted stuff over the next few days. For now I just wanted to give me general thoughts about the event. The battle reports will have some proper pictures but for now I'm too lazy and tired to put them in!

Tournament Format
Battle Brothers is the new name for the GW run 40K doubles event at Warhammer World. The format has changed a little this year in that rather than 2x 750pt armies you instead share 1500pts however you see fit between you. You can either take a full FOC from one codex or else use allies. It's a bit less restrictive than the old way but it does feel like it stops it being doubles. Still the joy of it is having 4 people around a table which makes for a much more enjoyable experience. Not being any sort of tactical genius means that when I play solo I tend to not put too much effort into winning. When I've got someone to bounce ideas off I tend to find we perform better together.

In the past we've had some issues with the scoring system. I have to say they've gone in the right direction this time. Previously you simply gained points for win, draw, loss and then there were secret missions to add to your score. The secret missions were horribly biased towards some armies and with only 2 each a game there still wasn't much to separate scores. 

They've now embraced the 6th edition VPs so that you record your absolute score rather than just a win or loss. This means that you've got a much better chance of being able to separate the teams out in the final scores. Sadly, they still insist on including Favourite Game votes into the totals and what's worse they've made them worth 3pts each. That means a potential 30pts extra if everyone you play votes your's as their favourite game. I've talked before about the random nature of this and its inherent problems (i.e. not everyone votes, people vote for their mates and you're not likely to vote for someone who crushed you). It leads to a situation where the guys who win aren't necessarily the best generals! In the case of this weekend the guys who finished 2nd should've by rights been 1st, 4th should've been 2nd and worse 9th should've placed 3rd! The most shocking is the guys in 23 should've jumped 10 places to 13th because they didn't score any fave game votes!! 

At the end of the day GW are keen to make this a friendly tournament so you can understand their intention is to encourage people to try to make their games enjoyable for their opponents. If you go to the tournament in the knowledge that it isn't a harsh competition and don't worry about your placing too much then it isn't a big deal.

Speaking of encouraging friendlier games. GW took the unique step of making the draw for all 5 rounds random. This makes perfect sense in a friendly tournament but is a bit crap for less experienced players. In swiss pairs they might get a crap 1st, and maybe 2nd, game but otherwise will be playing opponents at a similar level. By randomising it completely there's the potential for them to have to suffer several games against opponents who will demolish them. From out perspective it was great because it allowed us to avoid some of the "top tier" lists for the whole weekend. None of that second game on Sunday on table 2 shenanigans like we had the last two times!

Tournament Organisation
We've attended four of the previous doubles events and despite the usual issues with GW tournaments (i.e. high cost and lack of prizes) we've consistently enjoyed them. I think this is down to the atmosphere. So many people packed into the room makes it much more fun I reckon. They'd put slightly more effort into organisation because we got a name badge each (proper plastic not like the crap ones at that shitty Blog Wars event :P) and an event pack with our first table number, score card, colour copy of the rules pack and.... a free pen!! This is pretty shocking for GW who are soo tight at these things that they print the results for 119 teams in a tiny font to fit them on a single page. You might say they're trying to save the rainforests but I'd say its cost saving! 

I was surprised they'd put the time and money in to give us packs and it was a welcome change. Presumably the money they saved by doing away with the secret missions went on the packs!?!

Refereeing
You'll be able to read more about this in the full battle reports over the next couple of days but here's the problem in detail so that it doesn't spoil the flow of the battle report (why is there always something? - it must be us!). 

In our second game we had our opponent bring a stormtalon on then attempt to use the guns on it at a dreadknight who was very close to their table edge. We said that the weapons wouldn't be able to hit as the dreadknight was outside of their 45 degree fire arc. We produced a neatly folded bit of paper to act as a guide for the size of the fire arc. Our opponents said that the weapon could actually turn 45 degrees to the left and 45 degrees to the right based on the wording of the entry in the rulebook. Here's the entry from page 72 of the rulebook (click to make it bigger):


As you can see from the diagram the hull mounted weapon on the Leman Russ has a 45 degree field of fire. Even if the diagram isn't 100% accurate the arc clearly isn't 90 degrees. We showed them this and then had a discussion about what weapons were hull mounted. We said the codex has to specifically say that a weapon is turret or sponson mounted or else it must be hull mounted. This prompted a call to the referees who agreed that the weapons were hull mounted. Our opponents then asked the referee about the fire arc. The last line of the paragraph next to the diagram reads "Additionally, assume all hull-mounted weapons can swivel horizontally up to 45 degrees". Both our opponents and the referee argued that this allowed the weapon to turn 45 left or 45 right giving a total of 90 degrees. We said it was 22.5 degrees each way i.e. 45 total and the argument continued. In response to this the ref who came over went to fetch the head ref to settle the matter. 

Having been pointed to the correct page the ref agreed with our opponents that it was 90 degrees total and hence the weapons could be fired. This to us was clearly wrong so I tried to state our case to which I was met with "I'm not interested, I've said what the rule is so drop it" from the head ref. Repeated attempted to explain our angle on it (pardon the pun) were met with refusals to even listen. We therefore had little choice but to give up and let the shooting go ahead. Of course this meant that the lascannon, multimelta and mindstrike missiles managed to kill off the dreadknight (Matt failed his invulns). 

I'll talk in the battle report about how significant this was but the main problem here is that the referees clearly don't have a good enough grasp of the rules. I had a chat with Nick Bayton at the end of the weekend about it and apologised for arguing so much with the head ref. The issue I had was his attitude more than anything else but Nick's response was that they try to get these disputes settled as quickly as possible. He said that they aren't really there for rules queries but rather players should work it out between them. This is fair enough in theory but if you know you're right, it's not that easy to use the "Golden Rule" and just 4+ it or something.

Anyway, I'd be interested to see what you guys think. I'm glad I've got that bit out of the way so the battle reports don't sound as bitter. It's worth pointing out the arguments with the ref we actually had a good laugh about the whole thing with our opponents Sean and Darren. Fair play to them for being understanding about my attitude. I think Sean could identify with it! Anyway, sadly those guys finished 1 point above in the overall rankings which makes it grate even more. 

Right onto the cheerful battle reports!!

Saturday, January 26, 2013

Battle Report: First Game with Dark Angels (1850pts)

As you may have read here, I've been trying to put together a decent Dark Angels list using the new codex. Part of that process is obviously playtesting. With that in mind Jamie and I decided to have a Dark Angels vs Dark Angels battle to try out the new book and see what we could learn from each other's lists. Think of it as a live fire training exercise!! I'm going to do a very brief battle report and then a pretty detailed unit by unit analysis.

I took List A from my previous post which consisted of purely Ravenwing units. At this point let me apologise for the quality of the pictures. It wasn't the most immersive game of 40K I've ever played since my army was pretty much totally grey plastic and my bikes didn't have riders!! Anyway, Jamie had a very different list that took units from all three wings. He'd got something like this:

Jamie's 1850pts of Dark Angels
Azrael
Librarian
Command Squad (plasma guns & Standard of Fortitude)

Veterans with assorted power weapons (joined by Azrael)
Rifleman dreadnought

10 Tactical marines (missile/flamer i think)
5 Tactical marines  (heavy bolter
5 Deathwing terminators (assault cannon, 1x claws, 2x TH/SS)
3 Ravenwing bikers (plasma, melta, serg)

Devastator squad (10 man, 2 missiles, 2 plasma) - combat squadded

Aegis Defense Line (no quad gun)

Think that's right but I'm doing it from memory so the points might not add up. Anyway, pretty mixed bag of stuff but the idea is that everything clusters behind the aegis line and uses the FNP from the banner to weather fire and hold the objectives. Meanwhile terminators and bikes make a break for distant objectives.

Battle Report
I got first turn and deployed everything centrally clustered around my Darkshroud with Sammael out front. The attack bikes and a combat squadded RW attack squadron went on each flank. Jamie sat everything behind his aegis with his 10-man tactical squad with libby, RW and DW in reserve. He then stole the initiative!

Without moving I wasn't getting my Jink saves which cost me an attack bike and a couple of other bikers. Sammael initially took two wounds until I remembered I had an apothecary in the command squad and promptly passed my FNP saves. Most importantly the Darkshroud survived a penetrating hit but was left immobilised. Great! I then advanced up the field and tried to make the most of my Standard of Devastation by unleashing a salvo of fire. Sadly Jamie's armour and FNP saves were sickeningly good so he didn't end up losing much.

Jamie killed off a few more bikers including most of the command squad (including Sammael who fluffed his saves from the dreadnought). The tactical squad walked on but couldn't kill the remaining attack bike. Terminators dropped on an objective in my deployment zone. With the standard still around I fired off another volley hoping to thin out the veterans and then charge them with two attack squadrons. One squadron snake-eyed its charge range leaving the other to get mauled in combat by Azrael and his veterans. Another squadron failed to kill many devastators and got bogged down in combat with them. The remaining squadron killed 4 of the devastators with the help of the black knights but this put them well out of combat range.

Somewhere in all that the Nephilim showed up and killed the dreadnought (just!) before failing to do much else. More on that below.

The following turn saw a lot of bikes go down to the rapidly changing firepower vs surviving bikes ratio. This allowed Azrael and his vets to maul the attack squadron that'd failed the charge. The black knights swung round and wiped out Azrael and his squad in revenge but were cut down by the terminators next turn. Eventually the protracted combats were won by Jamie and I was left with an immobilised Darkshroud and a heavy loss.

Unit by Unit Analysis
Sammael
Sadly all I got to see of him was one plasma cannon blast which Jamie saved anyway! He died a bit cheaply but probably because he was front and centre and an obvious target for Jamie. Perhaps its worth keeping him back a bit to react to enemy movements thereby helping keep the RW command squad alive longer too.

Librarian on Bike
Had a difficult time choosing powers for him. In an army full of twin-linked guns, Prescience isn't as much use and I couldn't decide on another discipline. His Power Field Generator is a bit of a waste of time in this list too. Whilst out of combat the squad get 3++ or 4++ depending on if they turbo-boosted. In combat he's giving the enemy an invulnerable save defeating the corvus hammers and his force weapon! Therefore the points would probably been better spent on mastery 2 and hence two rolls on the powers. His auspex could be pretty useful and if he's using Blessings he won't need to shoot anything else.

Ravenwing Command Squad
The apothecary helped keep Sammael alive a bit longer (if only briefly). The inclusion of a grenade launcher was useful as rad grenades can make the Standard of Devastation salvo even more potent i.e. 4 shots at 12", twin-linked BS4 and wounding on 3's! The standard survived a while but probably because Jamie didn't focus on it quickly enough (as he admitted). Had Jamie not been quite so good at 3+ saves followed by 5+ FNP he'd have lost a lot more! It's certainly something worth taking if you've got a large number of bikes and it wasn't that difficult to keep things in 6" range of it.

Ravenwing Attack Squadrons
Probably due to the fact that this was my first game using bikers since 2nd edition I don't think I used them to their best. For starters the attack bikes should've gone into Outflank reserve to get them in on the dreadnought unscathed or else challenge for objectives. Might even consider heavy bolters to use them as interference on objectives rather than tank hunters.

My biggest mistake was in my use of the normal bikers though. They shouldn't really be charging into combat, especially that veterans squad with all those power weapons. Essentially you have to think of them as highly mobile tactical squads only charging in when desperate or confident of winning the combat. I wasn't taking too much damage from Jamie's shooting and should've made him come to me a bit more to play to my manoeuvrability advantage.

They do put out a disgusting number of shots with the standard but it also made me forget to use my special weapons. Part of me thinks the plasma guns aren't necessary as they aren't actually much better than the salvo 2/4 bolters. Obviously if the standard dies or against mech they become useful again and low-AP is nice. Could be somewhere to save points though. The meltaguns are good for the amount of FNP out there and cheeky vehicle kills.

Ravenwing Black Knights
Love them as much as I thought I would! The highlight of the game for me was when they killed off Azrael and his remaining veterans. Here's what happened.

Azrael and the veterans were fresh from combat and consolidated into a crater. The black knights had been lining up the terminators but I spied a chance for some consolation kills. The veterans were still in range of the standard so would be getting FNP on top of their cover but I had other ideas. The librarian used his Auspex to reduce their cover to 6+ and the remaining grenade launcher hit with a rad grenade leaving them with T3. The plasma talons were lucky and hit and wounded with all 6 shots. The veterans were easily wiped out and Azrael was faced with two Iron Halo saves or extinction. Jamie rolls a 4 and a 1 and thanks to doubling out their T3 with S7 he was insta-killed and couldn't take FNP.

Now, there's debate about whether that's legal or not. Some argue that the grenade launcher and auspex happen at the same time therefore the plasma talon shots don't benefit (combat would though). However, my take on it is that the auspex and rad work as long as they hit. You then roll to wound after this so it isn't quite as simultaneous as people claim. Hopefully it'll get FAQ'd I hope how I did it is RAI. The thing that makes me think it is that it specifically says rad grenades can affect the Instant Death threshold.

Either way they're a great unit and most armies will fear them. Sadly they got charged by the terminators and failed to hit with Overwatch. They then failed to rend and bought it to lightning claws and hammers. More fuel for the "don't charge with bikes" fire.

Darkshroud
Despite being immobilised I managed to get 2-3 turns of Stealth for a lot of my army. It's a big, obvious target though and relies heavily on you getting turn 1 for maximum effect. If you get Night Fight it could be excellent in that first turn though. I originally thought it should have 3 hull points and be a bit more expensive but frankly with AV10 it's going to go down to a penetrating hit so hull points won't help much. For the points I think it's definitely worth including in a bike heavy list.

Nephilim Jetfighter
Here comes the disappointment. I'd convinced myself that it wasn't that bad. Sadly, it really is. Now obviously Jamie didn't have flyers for me to test it against but I think I know how that'd go. It was lucky to take out the dreadnought (thanks to it already losing a hullpoint from the attack bike) and didn't do anything for the rest of the game.

Having just written those "How to Deal with Flyers" articles I'm thinking it's a bit of a waste of 180pts. Part of me thinks I'd be better ignoring flyers and focussing my attention on everything else instead. Time will tell I suppose. Difficult to persuade myself to keep it in the list though. It's too expensive for what it can do and S6 missiles just feel like a kick in the teeth. A Blood Angels Stormraven is 20pts more and about 20x better!

Overall Analysis
I was worried that there wouldn't be many bodies in this list. Granted Jamie didn't have many either but I think a pure-ravenwing list is certainly viable. I can trim the points down a bit and perhaps include something from the other wings though. Maybe even some land speeders to keep it ravenwing.

Even though it was all grey plastic and missing bits here and there I really loved how the army looked on the table. Once I get a bit better hang of using them I'm sure they'll be a lot of fun.

I'll be trying to do something similar to this for my first few games with Dark Angels. I know it's a bit of a lengthy post but I wanted to get my thoughts down in type to help me plan out my furture lists. I hope it was useful for others too. I'd love to hear your thoughts.

In other news, as you can see I haven't made much more progress on my scenery! I'm determined to get it done though because I hate how it looks in these battle reports. It'll make a nice break from painting all those bikes!!

Friday, January 25, 2013

How To Deal with Flyers in 6th Edition 40K - Part 3


I'm sure if you asked most people what the biggest change in 6th edition is they'd say "flyers". I'm not sure I agree with that, but it seems to be a hot topic all the same. Whenever you write a list at the back of your mind you're always thinking "how am I going to deal with flyers?". Even if you aren't, you can guarantee if you post a list up on a blog or forum people will quickly ask the question. With the new DA codex it's something I've been thinking about a lot. So what's the best way to deal with them then?

Hopefully you've already read the first two parts of this article here and here but if not, take a look first and come back. This final part will continue our look at the options available for dealing with enemy flyers before drawing it all together.

Twin Linkage and Torrent
As I'd hope you all know by now, the problem with trying to kill flyers is that 6 to hit. After that they're no harder to kill than any other vehicle. Without spending points on dedicated anti-air units the remaining option for trying to shoot them down is with either twin-linking high strength shots or else a high volume of shots mid-high strength shots. Obviously there are lots of options here so I'm not going to go into all of them. Here's a few ideas.

Take a psyfleman dreadnought for example. These mainstays of a lot of Grey Knights lists in 5th edition offer a reasonable chance of killing flyers. Back to the dreaded Mathammer and they have a roughly 1 in 10 chance of killing an AV11 flyer in a single volley. Not bad for 135pts since they're still useful for killing other vehicles, instant killing multi-wound T4 models and generally being a pain in the arse. HPs mean they aren't as durable but they still aren't that easy to shift and you'd have probably taken them in your GK army anyway!

My current favourite for killing flyers though has to be Tau Broadsides, with S10 AP1 railguns they've always been a threat to vehicles. A pair of them have a better than 25% chance of killing an AV11 flyer in one volley and 20% chance of doing the same against AV12. For 203pts you get a team with 2+ saves, two shield drones to keep them alive, ASS for moving to deny cover, a target lock to let them hit two different targets and a blacksun filter for night vision. That to me is a pretty enticing package! Not cheap by anyone's standard but everyone fears a broadside! With Tau able to ally with pretty much everyone they're worth considering.

A lot of other units can easily be made twin-linked now thanks to the wide availability of the Divination psychic powers and hence Prescience. For example, a cheap DA psyker attached to some devastators can make them into a potential anti-air threat. I'd even argue that it'd be more useful to spend your points on attaching a psyker than giving them flakk missiles.

A good example of torrent is Eldar War Walkers. 24 S6 shots might result in a lucky penetrating hit on a flyer. Throw in Fortune and you've got a real chance of gimping an AV11 flyer. Bit of a waste of the unit mind you. The other way to look at torrent is by focussing several different units with a low chance of killing a flyer onto one in the same turn and hoping you can accumulate enough hit points or get a lucky pen. Most of the time that fire can be put to better use though.

Finally, the ultimate example of non-dedicated anti-air that works is the Necron Annihilation Barge. Being S7, Twin-Linked and Tesla makes these really dangerous to flyers. They get two bonus dice for every 6 they get from their Tesla rule which means those hits soon mount up. For 90pts they're pretty much an automatic choice for Necron players. It's not like Necrons needed much help doing well in 6th edition though!!

Close Combat!?!
Are you seriously telling me CC is a viable anti-flyer option? Well yes, actually. Obviously this is only any good for flyers in Hover mode but when they leave themselves vulnerable in this way you've got to take the opportunity with both hands. In the last doubles we attended we actually took down four stormravens using only CC attacks! Granted we had and S10 thunderwolf and dreadknights but that's hardly the point.

Seriously, though it might be the only chance some armies get to take down a pesky flyer so its worth keeping your wits about you and pouncing when you can.

Who Cares If You've Got A Shiny Plane?
The last option available is the least effective method of destroying flyers i.e. don't even try. I'm still writing lists without any anti-air options in them. Sometimes this will backfire horribly but on other occasions you'll find yourself at an advantage against an army that doesn't have flyers of its own but has spent points on anti-air.

Realistically this is getting to be less and less of an option though. You'd struggle to go through a two-day tournament without facing at least one flyer-spam list be it IG or Necron. Still might be better than wasting points on a token gesture quad gun though!

Conclusion
I've basically written these articles to try and collect my thoughts on flyers and how I'm going to deal with them with my armies. I'm not exactly spoilt for choice with my Space Wolves but there's still hope from allies. I think ultimately you have to make a decision about how many points you want to sacrifice to the cause. You can sink hundreds into it and still fail to swat a single fly.

I hope these articles have been useful to some of you. I'm not the first person to talk about flyers but hopefully I've given a different opinion that get's people thinking. It's going to be interesting once all the armies have their own flyers. I'm intrigued to see what the Tau Air Caste can produce for me and rumour has it I won't have long to wait. If Tau produce some strong anti-air units I can see them selling well as allies. It already sounds like a GW marketing strategy.....

Thursday, January 24, 2013

How To Deal with Flyers in 6th Edition 40K - Part 2

I'm sure if you asked most people what the biggest change in 6th edition is they'd say "flyers". I'm not sure I agree with that, but it seems to be a hot topic all the same. Whenever you write a list at the back of your mind you're always thinking "how am I going to deal with flyers?". Even if you aren't, you can guarantee if you post a list up on a blog or forum people will quickly ask the question. With the new DA codex it's something I've been thinking about a lot. So what's the best way to deal with them then?

Hopefully you've already read the first part of this article but if not, take a look first and come back. Right, this part will begin to look at the options available to us to deal with enemy flyers.

Dogfighting - Air to Air Combat
The most obvious way to deal with enemy flyers is to take some of your own. That's assuming of course your army has some to take! Some flyers are better than others at dealing with their opposite numbers (e.g. Stormravens and Vendettas) and should be able to kill an enemy flyer in a single volley, others (like the Stormtalon, Nephilim and Razorwing) might get lucky but the rest will really struggle.

How do you maximise your chances of achieving air superiority? The key is to make sure you get your flyer onto the table after they get theirs on. Might sound obvious but for most players the first target of their flyers is going to be any enemy ones they can pick on. Having some kind of reserve manipulation from Warlord Traits, Astropaths, etc. is pretty useful here. There's nothing like seeing your opponent proudly zooming his flyer onto the table only to have him take it away again in your turn!

The other useful tool here is Hover mode. Whilst it won't help you take down an enemy flyer (since you'll lose Skyfire in most cases) it can allow you to re-position behind an enemy flyer ready to take them down next turn and perhaps help you avoid their guns too. Obviously this puts you at an extreme risk from ground troops but you'll still have your Jink save to minimise the damage. Putting yourself in a position where you force your opponent to Hover can be a good option too.

The problem with using flyers to counter other flyers is that you aren't necessarily helping the overall war effort. Sure you're taking out a threat but you're risking points in the hope that your flyer will kill theirs before it dies. Most flyers offer a dual role though so you can probably justify them. Either way the better dogfighters are the ones with AP1/AP2 such as the Stormraven as they've got the best chance of getting that all important explosion.

Anti-Air Ground Support
With each new codex there are likely to be more and more ground based anti-air options becoming available. Having said that GW aren't going to want to totally gimp flyers by allowing reliable, low cost, anti-air in every codex. What's more likely is that you'll have to sacrifice a chunk of points in the hopes that you face enemy flyers and hence you haven't wasted these units.

At the moment there are only a handful of proper dedicated anti-air units out there so let's take a look at them. Firstly, the ubiquitous quad gun. Every army has access to one of them (despite the model looking a bit out of place in some armies) so they're the go-to-guys for token anti-air weaponry. You have to pay for the Aegis line though and 100pts for the set isn't cheap. Luckily the Aegis line has its uses but actually how useful is the gun? Being able to use Interceptor can help take out a flyer before it's even had chance to be an annoyance but they aren't all that reliable.

As regular readers should know, I'm not a fan of mathammer but here I think it's important to make a point. Really you want to be blowing the flyer up as it won't care if it loses a hull point or two. A quad gun operated by a BS4 model has a roughly 1 in 5 chance of destroying an AV11 flyer in one shot and a 1 in 10 chance of doing the same to an AV12 flyer. That's not all that great! Essentially, your quad gun will kill one flyer a game by straight explosion. The problem really is the lack of AP 1 or 2 to ensure a boom. Now as with all mathammer that's assuming a lot e.g you're in range, he doesn't manage to Evade or make any other kind of save and of course that he hasn't already killed your gun (which isn't that hard to do). For 50pts though it's not a bad option if you can find a use for the defense line. At least it has some utility outside killing flyers too and you might strip enough HP from a flyer for another unit to finish the job.

Moving on, the only pure Skyfire unit out there (to my knowledge) is the Imperial Guard Hydra. This is essentially just a quad-gun on a tank though and whilst it doesn't cost much more it's limited use outside anti-air. If you know you're likely to face flyer-spam then maybe but most IG generals will probably prefer to rely on Vendettas.

Finally, we come to Flakk missiles. When these were first spotted in the rulebook there was a lot of excitement about them and who would be able to use them. With the CSM and DA codexes we discovered that they're going to be pretty widely available to marine armies but at a hefty cost. Each missile launcher will set you back 25pts and whilst you still get all the advantages of the standard launcher you're making yourself public enemy number one. Most players will focus everything on taking out these units early before they can cause a problem for their flyers. The DA book allows for several launchers to be dotted around your army in scout, tactical and devastator squads. I have to wonder if it's worth it though. Coming back to the dreaded mathammer a 5-man (4 launcher) devastator unit costing 170pts will only give you a 15% chance of blowing up an AV11 flyer. Granted they're a bit harder to stop than the quad gun but they're also a lot more expensive.

So what's the solution here? Well as with most things in 40K if somethings good take several. Anyone who's basing a significant portion of their strategy around flyers will be looking at your list for the anti-air threats. If you've got that one quad gun then you can kiss it goodbye almost straight away. You're then faced with the next 4-5 turns taking pot shots with other weapons and hoping. By taking your own flyer, a few flakk missiles dotted here and a quad gun you're unlikely to ever be left without some kind of useful firepower. Mind you you'll have also blown a lot of points and regret if when your opponent hasn't got a single flyer!

Essentially what I'm trying to say is that by choosing these units to tick the "I can deal with flyers" box is a bit of a nonsense. Quad guns, flakk missiles and Hydras really can't reliably deal with them. I mean granted nothing can at the moment but you have to weigh up if you can afford the cost.

In the next article I'll look at other ways of dealing with flyers outside the obvious.

Wednesday, January 23, 2013

How To Deal with Flyers in 6th Edition 40K - Part 1

I'm sure if you asked most people what the biggest change in 6th edition is they'd say "flyers". I'm not sure I agree with that, but it seems to be a hot topic all the same. Whenever you write a list at the back of your mind you're always thinking "how am I going to deal with flyers?". Even if you aren't, you can guarantee if you post a list up on a blog or forum people will quickly ask the question. With the new DA codex it's something I've been thinking about a lot. So what's the best way to deal with them then?

This part of the article will talk about the current flyers in the game with an attempt to categorise them and then parts 2 and 3 will be about methods of dealing with them. (I'm not going to talk about flying MCs here because they're a very different prospect. Similarly I'm not going to mention Forge World units as it's a whole other can of worms!)

Currently Available Flyers
Let's begin by looking at the current cohort of planes that 40K generals have access to:

Blood Angels/Grey Knights - Stormraven (AV12) - lots of firepower, strong armour (with ceramite plating), large transport capacity, hover mode. Pretty much the daddy of flyers, especially the BA version. GK version is distinctly weaker. High cost means you won't see many in sub 2K lists.
Chaos Space Marines - Heldrake (AV12) - hades autocannon is pretty weak so most will have a baleflamer. This combined with the vector strike make a real threat to MEQ infantry and even high toughness. AV12 makes it tricky to deal with.
Dark Angels - Nephilim/Dark Talon (AV11) - bit of a letdown in terms of equipment. Nephilim pretty much has to choose whether to take the lascannon and hope to get lucky vs AV12 flyers or the megabolter and be better against infantry. Dark Talon is useless against other flyers and not much better against troops.
Dark Eldar - Razorwing and Voidraven (AV10/AV11) - both are potentially useful against other flyers but low AV so pretty weak. The missiles can be great against infantry in the right situation though.
Imperial Guard - Valkyrie/Vendetta (AV12) - valkyries will get overlooked in favour of vendettas which offer great anti-air with twin-linked lascannons. Transport capacity plus the ability to Outflank and Hover is a great combo. Dirt cheap too!
Necrons - Night Scythe/Doom Scythe (AV11) - disgustingly cheap and those tesla shots make their firepower extremely useful. Essentially flying annihilation barges with invulnerable troops inside! Expect 3+ in most sub 2K lists.
Orks - Dakkajet/Burna Bommer/Blitza Bommer (AV10) - pretty cheap but AV10 makes them the weakest flyers out there. Dakkajet is probably the most useful and for the points it can put out a lot of S6 hurt, especially with a Waaagh!
Space Marines - Stormtalon (AV11) - much maligned both in the looks and performance departments. Personally I disagree on both counts. Relatively low cost and decent weaponry means its a good little anti-air platform. AV11 and 2 HP don't make it the toughest plane out there though.

That's quite a list. Whether you like it or not you're going to have to think about flyers when you're writing a list for 6th edition 40K. When you throw in the MCs that means only Space Wolves, Sisters, Tau and Eldar don't have anything airborne in their codex.

Types of Flyers
Basically, there's 3 types here: a) AV12, b) flyer-spam, c) high surface threat. Obviously there's some cross over within these categories. Let's start by looking at what I mean with these.

a) AV12 - with most of the anti-air weaponry out there being S7 and many of the flyers having limited access to S8+ weaponry, it's flyers with AV12 that are the hardest to deal with. You can hope you get a lucky pen followed by an explosion but that's unlikely. Unless they hover (which all the AV12 ones can choose to do) you're going to have to be lucky to deal with them easily. However, luckily for you most armies will struggle to field more than 1 or 2 of them.

b) Flyer-spam - some armies, like Necrons and Imperial Guard can take multiple flyers without hampering their list. Imperial Guard Valks/Vendettas are strong because they're AV12 too but luckily AV10 on the rear! The Necron Night Scythes are plentiful because, not only are they a troop transport but also they're dirt cheap too. A lot of the top Necron tournament lists at the moment feature 3+ scythes. In both of these cases the flyers will contain scoring units so you're going to have to deal with them at some point in objective games (i.e. most games).

c) High Surface Threat - whilst some flyers are particularly aimed at taking out other flyers or vehicles, some can pose a real threat to your troops too. Good examples of this are the CSM Heldrake, Ork Dakkajet and Dark Eldar Razorwing. Essentially their main purpose is to cut down your troops in large numbers. If you ignore them you're going to have to tolerate losing a lot of infantry in the process.

Whilst all the flyers are reasonable at taking out other flyers (particularly AV10/AV11 ones) there are some that are better than others and this means that you have to look elsewhere for your anti-air firepower. In the next part of this article I'l talk about your anti-air options in more detail.

Tuesday, January 22, 2013

GW Battle Brothers Tournament Army List

Battle Brothers is the new name for GW's doubles events at Warhammer World in Nottingham. There used to be a couple of these a year but I think this year there'll be more like half a dozen of them!! I should point out that yet again Matt and I are on the cover of the bloody rules pack! Matt's the one in the red shirt on the front row looking like a special person.

Anyway, the old format was that you both took an even number of points each (e.g. 2x 750 or 875) to make one combined army. With the allies changes in 6th they've decided to do things a little differently. Rather than you both taking the same number of points they've now done it so you have 1500 pts and one FOC (+/- allies) between you to form an army. This leads to greater freedom in the lists you can take as you aren't worried about one army overspending if the other has underspent. However, for me it kind of defeats the point of it being a doubles tournament. Essentially, you can take a normal 1500pt tournament list and pretend it's a doubles list. You don't even have to take allies!

Regardless of my misgivings about the format we're actually taking something very similar to last time. The idea being to have fun playing our games rather than particularly worrying about winning! Here it is:

Titanic Fenrisians 1500pts
Grey Knights Primary Detachment
Coteaz

5 Purifiers (2 psycannon, 2 halberds)

3 x 3 Warrior Acolytes

Dreadknight (personal teleporter, heavy incinerator, greatsword)
Dreadknight (personal teleporter, heavy incinerator)

Space Wolf Allies
Wolf Priest (runic armour, Saga of the Hunter)

10 Grey Hunters (melta, plasma, standard, wulfen)
10 Grey Hunters (flamer, plasma, standard, wulfen), drop pod

3 Thunderwolves (storm shield, power fist)

It's a nice multiple deathstar list with no solid core and no hope of playing the mission! The acolytes will either hide behind scenery all game and get ignored or else die cheaply and quickly. Either way they're only there to give us a few troops without spending much so we can afford fun stuff! The most obvious weakness of this list is anti-air, in that we don't have any! Having said that, last year we took a very similar list and managed to kill 4 stormravens in a game!

Essentially by the end of turn 2 most of our army will be in their deployment zone. The dreadknights teleport forward and incinerate stuff, the drop pod slams in and tried to alpha something whilst the thunderwolves and purifiers leg it up the field quickly hoping our enemies are distracted enough. Meanwhile the sneaky little wolf priest outflanks his squad in the direction of an objective or else something juicy.

It's hardly foolproof but it will certainly be fun to play. It's full of hit and miss units but when they hit, they really hit hard. If we come up against a "rock" to our "scissors" then we're screwed but hopefully most of the time we'll meet "paper".

Anyway, hopefully I'll see a few of you guys there and meet some new people too. Despite me saying nearly every time that I'm not gonna go to one again these events are always fun and even though they're expensive I find myself buying tickets!

Friday, January 18, 2013

My First Attempts at Dark Angels Lists (1850 pts)

Since the codex came out I've been struggling to get to grips with it enough to create some lists. Whenever I start a new army I have what the Americans would call "kid in a candy store" problem. There's so many units that I want that I end up running out of points pretty quickly. The more I try to write lists the more I love this new book. Now this all might change when I actually put some stuff down on the table but for now I'm pretty excited! I'm currently working at 1,850 pts in the hopes that I can get the army ready for Blog Wars 5 (details soon!) but we all know how that'll go. Anyway, here's what I've managed to come up with so far:

LIST A - 1,850 Dark Angels - Pure Ravenwing
Sammael
Librarian on Bike - Auspex, Power Field Generator
Ravenwing Command Squad - Standard of Devastation, grenade launcher, Apothecary

Ravenwing Attack Squadron (6 bikes) - plasma, melta, chainsword, MM attack bike
Ravenwing Attack Squadron (6 bikes) - plasma, melta, chainsword, MM attack bike
Ravenwing Attack Squadron (6 bikes) - plasma, melta, chainsword
Ravenwing Attack Squadron (4 bikes) - plasma, melta, chainsword

Ravenwing Black Knights (6 bikes) - 2 grenade launchers
Ravenwing Darkshroud
Nephilim Jetfighter

Sammael will join the Black Knights and cruise around looking for targets. Their grenade launchers should help those corvus hammers insta-kill stuff if they hit with both rad and stasis. His plasma cannon will work nicely with the squads plasma talons.

The libby sticks with the command squad and uses Divination powers. The apothecary should hopefully keep the relatively small squad safe when combined with the 4++ save from the power field. This should help against those pesky Heldrakes. The auspex should help the command squad's plasma talons pick off some targets in close and won't hamper the librarian.

The attack squadrons will try to stick as close to the standard as possible to unleash some punishing volleys. In objective games (i.e. most of them) they can combat squad which, with the attack bikes, gives me a whopping 9 scoring units! Hopefully if they can stay within range of the standard (and it's bearer stays alive) it won't matter that they are only Ld 8. The attack bikes will zip around either trying to stay safe for late objective grabbing or picking off any heavy armour that might appear.

The darkshroud needs to stay with Sammael to give his squad 2++ turbo boost saves (stealth, skilled rider). This will hopefully deliver them into combat safely and after that the shroud will probably be blown up.

The Nephilim is probably going to be useless but I'm determined to work it into the list. In the event that it's as useless as we all suspect then it'll probably be replaced by more bikes.

There's a punishing about of firepower here if its directed properly. The fire from the wealth of melta and plasma plus the devastation bolters will be difficult for most armies to absorb. Overall I'm pretty pleased with how this list looks. I've been wanting to do a pure RW list ever since I bought Dark Vengeance so I'll be giving this a test once I've got my bikes built and sprayed. Sadly I need to pop out and buy Sammael and a Darkshroud first though!

The problem I can see with this list is that it relies on a couple of key units staying alive, which they won't for long. That and it needs to be a bit of a blob to work at it's most effective which will never work on the table. Have to wait and see I suppose.

LIST B - 1,850 Dark Chocolate Angels (Green and Blacks - get it?!?)
Sammael
Librarian on Bike - Level 2, Bike

Tactical Squad (10-man), plasma gun, plasma cannon, chainsword
Ravenwing Attack Squadron (6 bikes) - plasma, melta, chainsword
Ravenwing Attack Squadron (6 bikes) - vet sergeant, plasma, melta, chainsword

Ravenwing Black Knights (6 bikes) - 2 grenade launchers
Ravenwing Darkshroud
Nephilim Jetfighter

Aegis line with quad

Very similar to the other list but with a static element behind the Aegis line. This will provide a bit more anti-air and with the bikes zipping around hopefully the tac marines will get ignore or else act as bait for counter charges from the bikes. This time there's a possible 10 scoring units. The tac marines are equipped based on the fact that I'm using DV models for now. I might switch things around a bit at some point and try flamer and a flakk missile launcher in each (although I'm not sold on them at all - more later).

With no standard, two of the attack squadrons have vet sergeants to hopefully keep them from running. The other will be joined by the libby so won't need it. The libby is mastery 2 here because then he'll have a better shot at decent powers but if this proves worthless he can swap to auspex/power field for the same points. This list only relies on a single model staying alive, the darkshroud, but without the standard it has significantly less firepower.

Conclusion
Not sure which I prefer from these two. Both have a ludicrous number of scoring units, granted their small and easily dealt with on their own but I'm sure my enemies will end up wasting fire on small units and won't be able to bring them all down. The chocolate list will be a good test of the combination of two different wings, the "green" bit isn't much in this case but provides a bit of stability.

Hopefully I'll get to test these out soon but I've got A LOT of bikes to build before I can! I'll update you on how that's going soon!

Thursday, January 17, 2013

Dark Angels Wargear - Special Issue and Chapter Relics

I'm still in the process of trying to write lists for my DA army. I've been making my usual spreadsheet for list building. I start with all the options and then try and thin it out to stuff I'm actually likely to take. This makes list building quick and easy as you don't need to decide on all the options every time. Anyway, to that end I'm trying to look at the Wargear section and figure out what will be useful. I don't think we'll know about some of the stuff until it's been playtested a bit but here's my current thoughts. I'm not going to describe what each weapon does because you can read that in the codex for yourself!

Special Issue Wargear
Auspex - I can see this being useful to make a burst of rapid fire really effective against some infantry huddled in cover. For 5pts its worth throwing in to most lists.
Combat Shield - Same as ever and can't really see the point unless you've 5pts spare but I'd rather have an Auspex in that situation
Infravisor - Being able to gain Night Vision for 5pts is great, especially when you stick it on a libby in a devastator squad!
Melta bombs - same as ever but as usual, very situational so only really worth it if you've already bought an Auspex!
Digital weapons - if you've pimped out a character with a nasty weapon it's probably worth giving them this (assuming that weapon isn't high strength). Librarians might find this useful to maximise their chances of a force weapon insta-death. Bit pricey though for a single re-roll per phase.
Porta-rack - unless we start seeing more armies with teleport homers/locator beacons then you're basically paying for the Preferred Enemy bit. Fear isn't much good against units that you'd actually struggle with in combat either. Pretty situational again. Can't see me using it.
Conversion field - 4++ save for 15pts. Most of the time this will be good. Causing Blind could be great provided your own unit passes the test with its re-roll! Worth considering.
Jump pack - doubt we'll see many assault squads in DA armies but might find some use with Battle Brother allies.
Space Marine bike - I think the most common unit here will be a libby on a bike. It's a shame about the Company Master but using a cheap chaplain/libby/techmarine can add some survivability to the RW command squad.
Displacer field - Bit of a strange one. For similar points to a storm shield (why couldn't they have just given us them instead?) you get a 3++ save but might bounce around the table a bit. Can't really see the displacement causing many problems as it's reduced if you land on something. Have to try this out in practice really. The question is how will coherency be affected? Be shame to lose Look Out Sir! if you scatter the wrong way.
Power field generator - great for shooting but of dubious use in combat. Chances are you don't really want to give your character's enemies a save too, especially since he's probably got a power weapon that'll be gimped by it! Only useful if you don't intend to get him stuck in. For example, cheap libby with Divination (Prescience) sat with devastators.

Overall an interesting selection but I think there's probably only the Auspex, Digital Weapons, Infravisor, Conversion Field and Power Field Generator that will get much use. Oh and the bike of course! The Displacer Field is a bit of an enigma at the minute. Could be great but might end up annoying.

Chapter Relics
Foe-smiter - pretty expensive for what is essential the same as a 3 shot storm bolter. If it were AP3 then I might take more notice.
Lion's Roar - basically a short range plasma cannon with a scatter re-roll. In the right situation could be great but I think for 20pts it's of limited use. Essentially paying 5pts to reduce range and gain a re-roll.
Mace of Redemption - In the hands of most characters this will be a pretty lethal tool. If you've done some toughness reduction it'll be insta-deathing marine characters too. Especially good against CSM. Blind & Concussive will severely hamper a big MC if it survives.
Monster Slayer of Caliban - 15pts more than the Mace and could end up being a power sword! Bit of fun but not that great.
Shroud of Heroes - not sure whether this will be good or not. 50pts seems a lot to me when half of its benefits won't get used most of the time.

Overall there's probably only the Mace and maybe the Lion's Roar that'll make an appearance in my army. Hope this little rundown helps people make their selections.

Right back to the army listing. I'll post up some of my ideas when I've actually made some I'm totally happy with!

Wednesday, January 16, 2013

New FAQs from GW including Dark Angels

As they did with the Chaos Space Marines codex, GW have been pretty quick in releasing an FAQ. Whilst this is a good thing, in the sense that at least people won't be stuck with units they aren't sure how to use, it frustrates me that they can't proof read a book properly when I'm spending £30 on it. Anyway, here's a summary of what's in there.

Dark Angels FAQ 1.0

  • Techmarines gain a boltgun to their wargear - won't affect much really
  • The plasma talon has been clarified as Rapid Fire which it was in the summary - stops the confusion
  • Belial and Azrael's wargear now match in both sections of the book
  • Relic banners thing is sorted in the ravenwing command squad - we all knew what it meant but nice that they made sure
  • Deathwing champions are one per army - not a big deal
  • Veterans can now all exchange their boltguns for other stuff - will make the unit pricey but at least you aren't restricted
  • Black Knight Huntmaster can now use the cool looking power maul on the sprue - although I'm not sure you'd bother.
  • Darkshroud doesn't have stealth but still has shrouded - again most rational people realised this was a typo but here ends the debate.
  • Wierdly, if you particularly wanted to you can now field Interrogator-Chaplain Seraphicus as a special character who loses Zealot in place of Litanies of the Dark Angels. Why exactly would you do that??


Finally, disappointingly, the only thing that gets changed on the flyers is the Missile Lock. I think we all knew that's all they'd do but a little bit of me died when I read it!

Nothing earthshattering here but good that they cleared up stuff that should never have made it into print. This is all well and good as long as you remember to check both the codex and FAQ whenever you're unsure about wargear. I reckon most people, like me, won't want to change it in their book in pen!!

Other FAQs
Again, nothing that significant but some good clarifications. Here's a quick run down.

  • Rulebook: For some reason rending isn't AP2 if you penetrate a vehicle. Bit of a shame, especially for my Black Knights
  • Rulebook: When shooting a unit you can now only kill models that are within range of at least one model from your unit. Makes sense but adds a bit more complication to the process.
  • Rulebook: If you get hit by the "You! You're the Traitor" bit of the Halluncination power from Telepathy you have to activate your force weapon and go for the insta-kill! This made my laugh and I'm sure it'll upset GK players.
  • BA/GK: stormravens can transport two different units. Great for sticking an assault squad in there with Mephiston.
  • CSM: the typo on the zombies rule is now correct and they play like you'd expect
  • CSM: the Heldrakes weapon is a turret! This makes no sense to me at all. It doesn't look like a turret and there's no need for it to be. Other vehicles have weapons that look like they could turn further but don't get more than 90 degree arcs e.g. DE ravagers. 
  • CSM: Abaddon can now join units with Marks which is what everyone thought anyway
  • Eldar: can't use psychic powers from within a transport which will severely gimp Fortune etc.
  • GK: bit of clarification about who can use what powers but interestingly Coteaz will lose Hammerhand when he swaps for rulebook powers but a Librarian won't?!
  • GK: Vindicare shots can't be avoided using Look Out Sir which makes sense.
  • Necrons: as in the digital versions, if the Night Scythe blows up its occupants walk on from reserve unscathed. I think this was totally necessary since the Necron book is too underpowered at the moment. /sarcasm
  • SW: more bad news for wolf scouts. Not only are they not allowed to assault from reserve but if you put a wolf guard with them they lose Behind Enemy Lines too!!
Conclusion
Nothing to write home about from any of the FAQs but it's encouraging to see that GW are addressing some of the issues that've been raised. There are still a few grey areas here and there but I think it's important for people to actually write to GW and question them so they are aware they exist.

LinkWithin

Related Posts Plugin for WordPress, Blogger...